Check your Google account settings
Your YouTube account is linked to your Google account, so the security of the former directly depends on the security of the latter. Therefore, you are advised to check the settings of your Google account in addition to your YouTube settings.
How to protect yourself against hackers
What for: So you don’t get hacked.
If you are using a short and simple password for your YouTube account, cybercriminals can figure it out and access your profile. To avoid getting hacked, use a strong password that:
- Is at least 8 characters long;
- Contains lowercase and uppercase letters, numbers, and special characters ($, @, etc.);
- Is not an actual word or easy-to-guess phrase;
- Is not the same as your passwords for any other accounts;
- Does not consist of information that strangers could easily find out (your name, date of birth, pet's name, and so forth — or those of your friends or relatives).
To change the password:
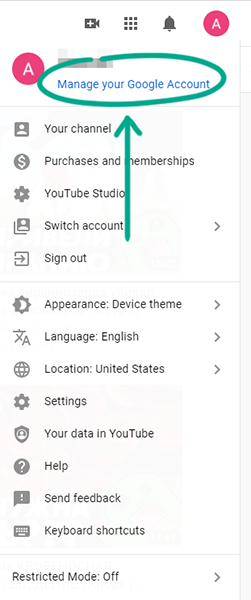
- Click the account icon in the upper right corner of the screen to open the menu;
- Click Manage your Google account;
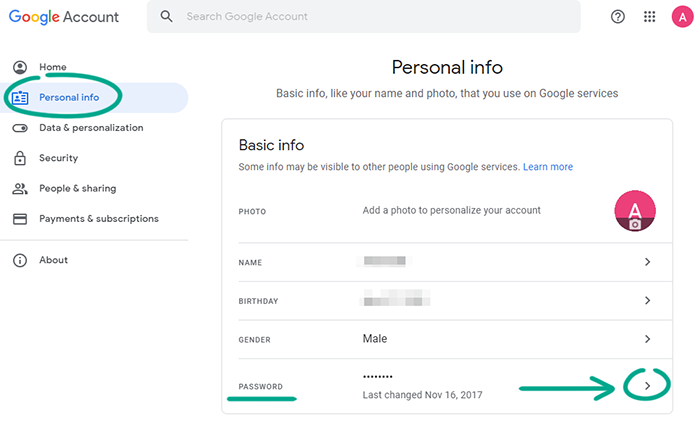
- In the menu on the left, select Personal info;
- Select Password and confirm your identity;
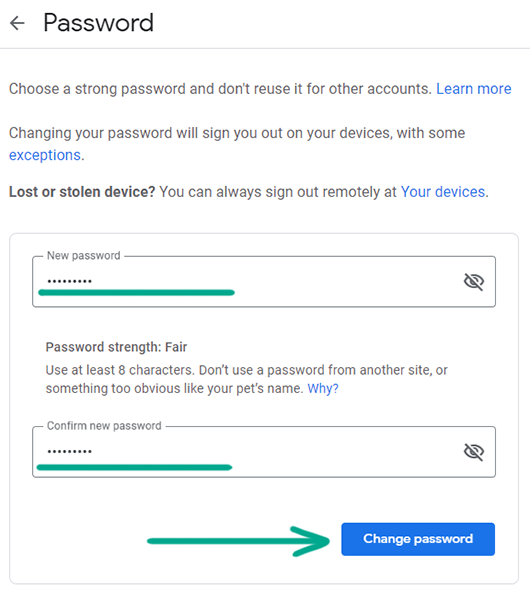
- Enter a new strong password twice and click Change password.
What for: To prevent hackers from using your accounts.
When making purchases, YouTube asks for the password of your account by default. However, the quick purchases option can be turned off, in which case payments will be made without confirmation. If you want to prevent accidental expenditures and protect your money, you are advised to not opt out of transaction confirmation. To check your settings:
- Click the account icon in the upper right corner of the screen to open the menu;
- Select Settings;
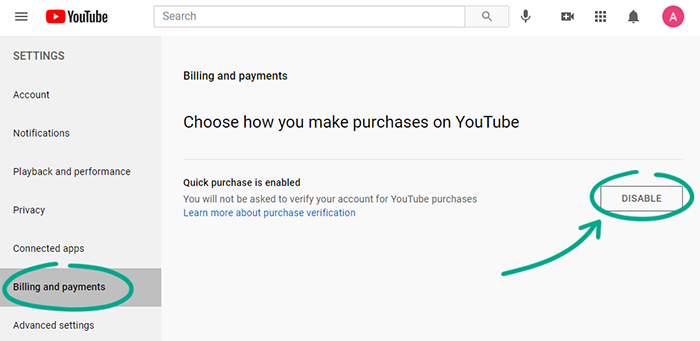
- In the left menu, select Billing and payments;
- If the quick purchases option is enabled, click Disable.
How to get rid of unwanted notifications
What for: To avoid distractions.
In your browser, YouTube may show notifications about the actions of other users on your channel and events related to your account and subscriptions. These notifications can appear regardless of whether the YouTube page is open, and can be irritating and distracting. To disable excessive notifications:
- Click the account icon in the upper right corner of the screen to open the menu;
- Select Settings;
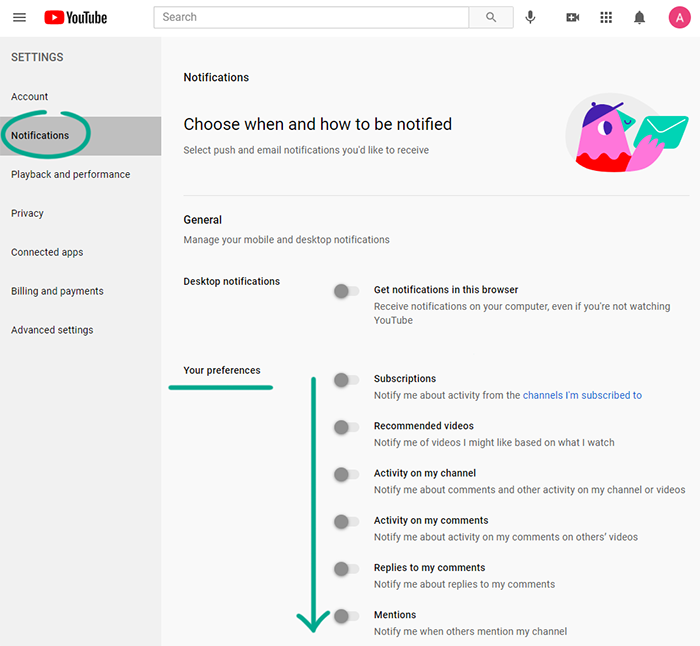
- In the left menu, select Notifications;
- In the Your preferences section, disable the notifications that could potentially be irritating;
- In the Email notifications section, select which types of events YouTube will send you e-mail notifications for. In any case, this service will send you messages regarding important changes to its operation and to your account, such as information about the status of your subscription or a blocked profile.
How to keep corporations out of your business
What for: To keep Google from knowing what you’ve searched for or watched.
Google saves data about your search queries in YouTube and a list of the video clips that you’ve watched. If you do not want the service to collect this information, you can disable the watch history and delete any previously accumulated data.
- Click the account icon in the upper right corner of the screen to open the menu;
- Select Manage your Google account;
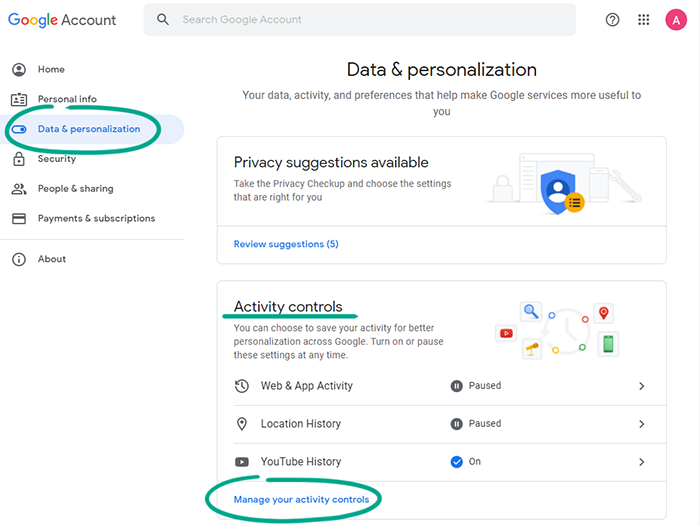
- In the menu on the left, select Data & personalization;
- In the Activity controls section, click Manage your activity controls link;
- Scroll down the page and disable the YouTube history option;
- In the window that opens, click Pause;
- In the YouTube history section, click Manage activity;
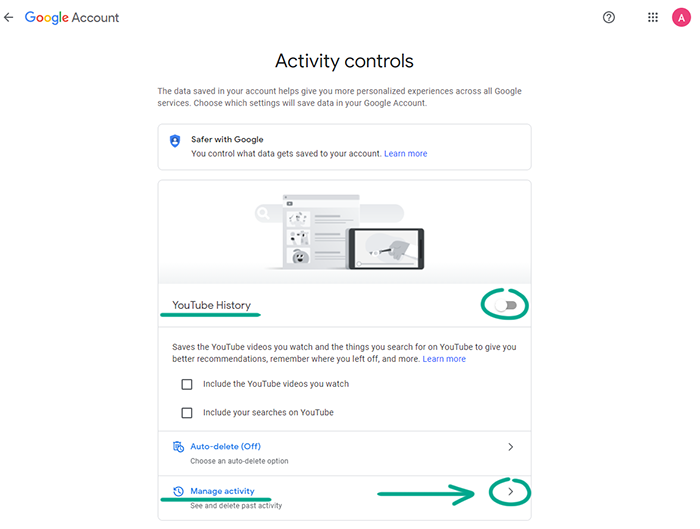
- Click the three dots to the right of the Search your activity field;
- Select Delete activity by;
- Select All time;
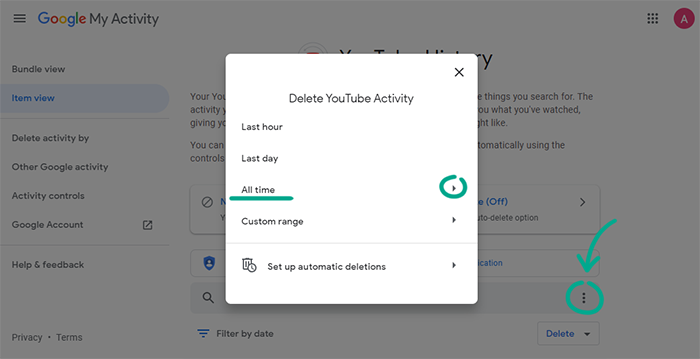
- In the opened window, click Delete;
- Click OK.
What for: To not see ads based on your interests.
YouTube may use data from your account and information about your activities to select targeted ads. If you do not want to see ads based on your interests, disable personalization:
- Click the account icon in the upper right corner of the screen to open the menu;
- Select Manage your Google account;
- In the menu on the left, select Data & personalization;
- In the Ad settings section, click the Go to ad setting link;
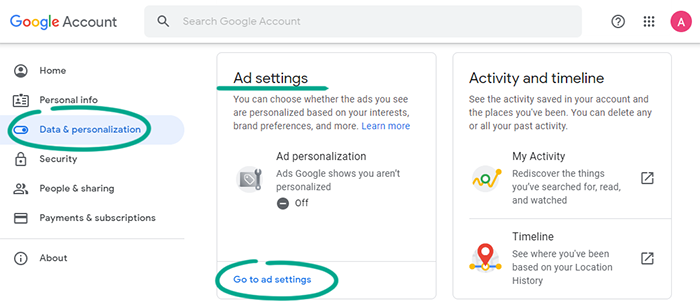
- Turn off ad personalization;
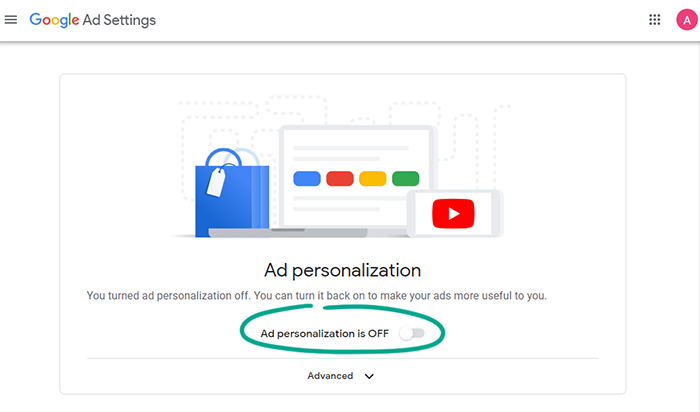
- In the dialog box that opens, click Turn off;
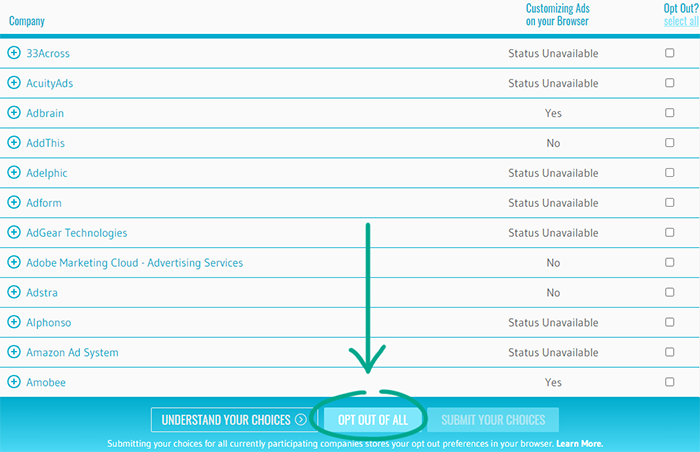
- In addition, you can block Google and other advertising networks that are part of the Your Online Choices initiative from choosing ads based on your interests. To do so, click the Your Online Choices link;
- Click CONTINUE at the bottom of the window that opens. You will see a list of advertising networks that track your online behavior;
- Click OPT OUT OF ALL and wait for the operation to finish.
How to prevent your personal data from being exposed
What for: So that strangers do not know too much about you.
The description of your channel might contain information that could be used to easily find out your address, place of work or study, and other information about you. Enemies or overenthusiastic fans could use this information to find out where you live and hang out, and then stalk you in real life. We advise editing to edit the description of your channel and deleting any confidential information.
- Click the account icon in the upper right corner of the screen to open the menu;
- Select Your channel;
- Click Customize channel;
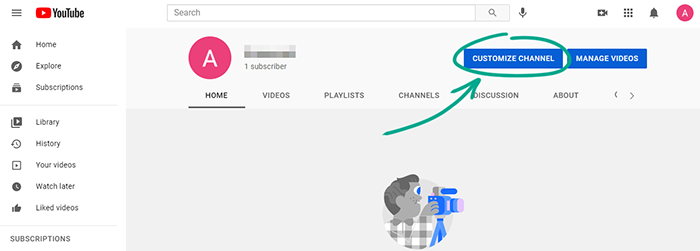
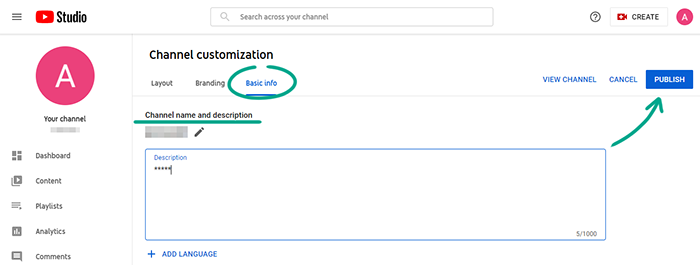
- Go to the Basic info tab;
- Click the Description field and delete any confidential information from it.
- Click Publish;
What for: To decide for yourself who can see your videos.
By default, anyone can watch any videos you upload to YouTube. If a video is not intended for a large audience, you can limit its visibility at any time.
To restrict access to an already uploaded video:
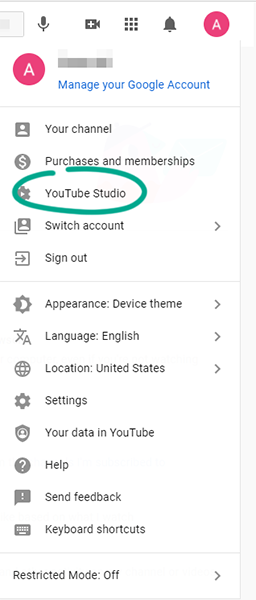
- Click the account icon in the upper right corner of the screen to open the menu;
- Select YouTube Studio;
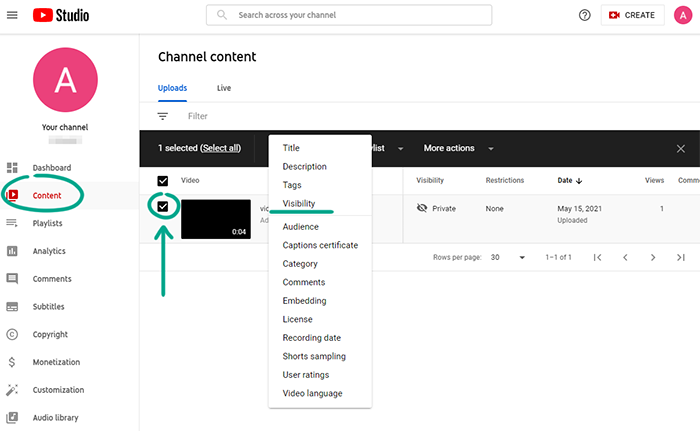
- Click Content in the menu on the left;
- In the list, find the video that you want to restrict access to, and tick it;
- Click Edit;
- Click Visibility and select an option from the drop-down menu;
- Public means that all Internet users will be able to watch the video,
- Unlisted means that only people who have a link to the video will be able to watch it,
- Private means that only you and the YouTube users that you approve will be able to watch the video;
To restrict access to a video while it is being uploaded to the website:
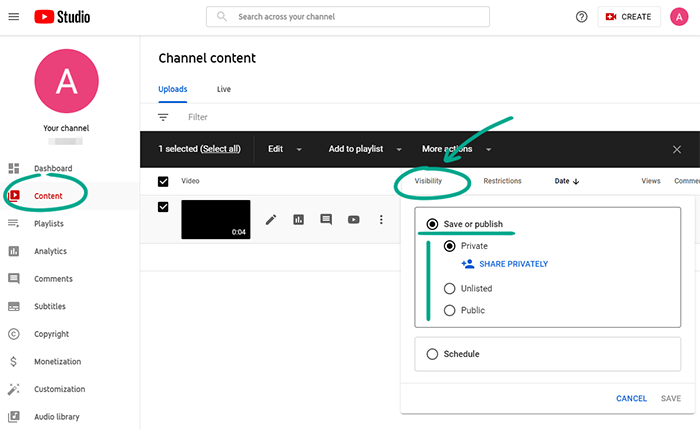
- When publishing a video, go to the Visibility section in the settings window. To do so, you may be required to provide information about the uploaded video clip (description, age restriction, etc.);
- In the Save or publish section, select an access level.
Keep in mind that access by link does not guarantee the privacy of a video; a user with whom you have shared the link can forward it to other people or post it on social networks.
Also bear in mind that approved viewers can record the video from their own screen and repost it on a different website. Therefore, if a video clip contains confidential information, it is probably safer not to post it on YouTube at all.
What for: To prevent strangers from knowing what you watch.
Your YouTube profile page contains information about your subscriptions and saved playlists. If you do not want other users to see this information, block access to it:
- Click the account icon in the upper right corner of the screen to open the menu;
- Select Settings;
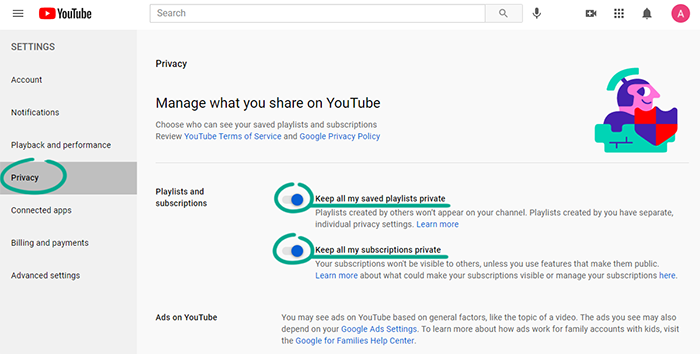
- In the left menu, select Privacy;
- Turn on the following options:
- Keep all my saved playlists private.
- Keep all my subscriptions private.
What for: To find out which of your information is collected by YouTube.
You can download an archive containing the data from your profile generated by Google. This will let you find out what kind of information the service collects as well as save it in case your account gets blocked, removed, or hijacked.
- Click the account icon in the upper right corner of the screen to open the menu;
- Select Your data in YouTube;
- In Your YouTube dashboard section, click More;
- Click Download YouTube data;
- Make sure that the check box next to YouTube and YouTube Music is selected and click Next step;
- Select how you want to receive your data archive;
- Send download link via e-mail
- Add to Disk
- Add to Dropbox
- Add to OneDrive
- Add to Box
- In the Frequency section, select how frequently you would like to back up your data. You can receive the archive once or configure automatic backup every two months for one year;
- Change the file format if you want. By default, Google will send you a ZIP file archive. However, if the size of the backup copy exceeds 2 GB, you will receive it in several parts or in ZIP64 format, which not all operating systems support. Using the alternative TGZ format enables creating archives up to 50 GB in size.
- Select the maximum size of a single file archive. If the total size of the archive exceeds this limit, Google will send it in several files;
- Click Create export.
Depending on the amount of data you request, generating the archive may take anywhere from several hours to several days. When the file is ready, you will receive a download link by e-mail.
How to defeat spammers and trolls
What for: To shield yourself from unpleasant people.
If users write abusive comments or inappropriate personal messages, add them to the black list. Blocked users will not be able to view your profile, leave comments under your videos, or write messages in live chats.
To block a user:
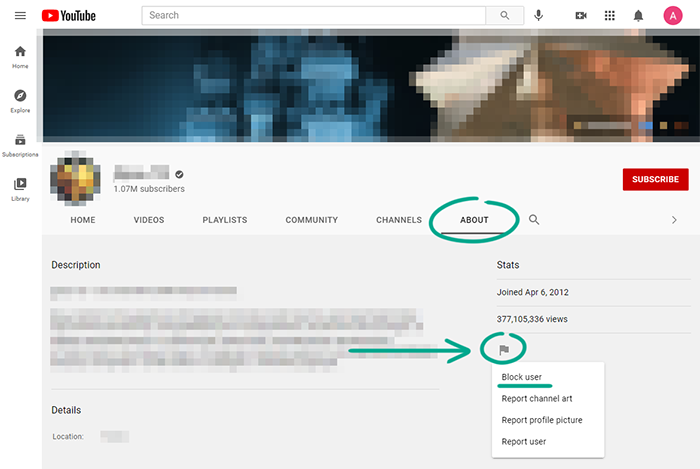
- Open the user's page on YouTube;
- Click About;
- Click the flag;
- Select Block user and confirm your choice.
You can also add the user to the black list in a live chat. To do so, click the user's message and select Block.
What for: To remove irrelevant comments.
If you do not want to disable comments to your videos completely, configure automatic filters based on prohibited words, or independently check potentially unacceptable comments before they are published;
- Click the account icon in the upper right corner of the screen to open the menu;
- Select YouTube Studio.
- In the left menu, select Settings;
- Go to the Community section; You will end up on the Automatic filters tab;
- Choose from the following:
- Appoint channel moderators who will be able to check comments and add users to the black list;
- Add approved users;
- Block users;
- Add specific words to a stop list so that comments containing these words are automatically deleted;
- Hold all comments containing links so that they can be checked.
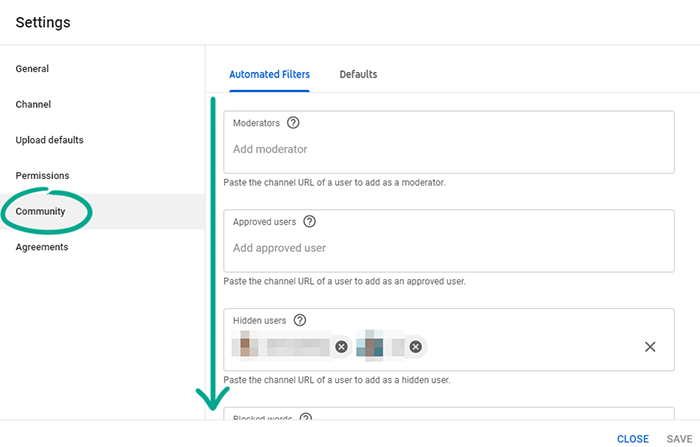
Note that these settings are also applied to live chats.
What for: So that you do not see any spam or offensive remarks in comments.
By default, all YouTube users can leave comments under your videos, which is a feature that is often abused by spammers and trolls. To block strangers from leaving comments or ads under your videos, restrict the ability to leave comments:
- Click the account icon in the upper right corner of the screen to open the menu;
- Select YouTube Studio.
- In the left menu, select Settings;
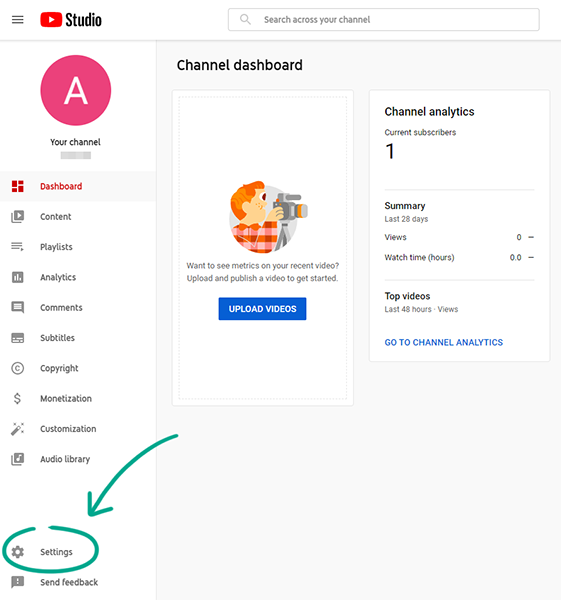
- Go to the Community section;
- Select the Defaults tab;
- Under Comments on your new videos, select one of the following options:
- Hold potentially inappropriate comments for review — to independently check comments marked as suspicious by the built-in filters,
- Hold all comments for review — to independently check all comments,
- Turn off comments — to completely disable comments;
- Under Comments on your Discussion tab, select one of the following options:
- Hold potentially inappropriate comments for review — to independently check comments marked as suspicious by the built-in filters,
- Hold all comments for review — to independently check all comments,
- Turn off comments — to completely disable comments;
- Under Messages in your live chat, check Hold potentially inappropriate chat messages for review;
- Click Save.
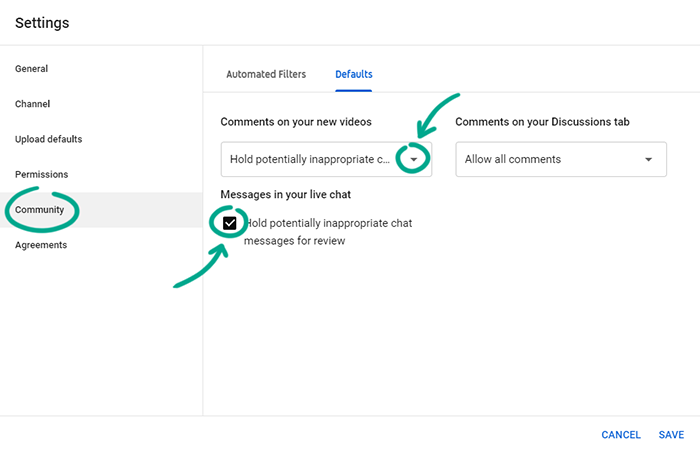
These settings do not affect your published videos and their comments. To change the settings of previously uploaded videos:
- Click the account icon in the upper right corner of the screen to open the menu;
- Select YouTube Studio.
- In the left menu, select Content;
- Select the check box next to the video whose comments you would like to configure;
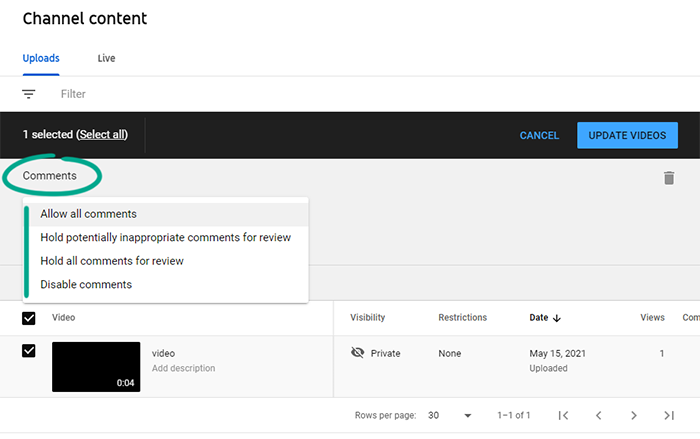
- In the Edit menu, click Comments and select:
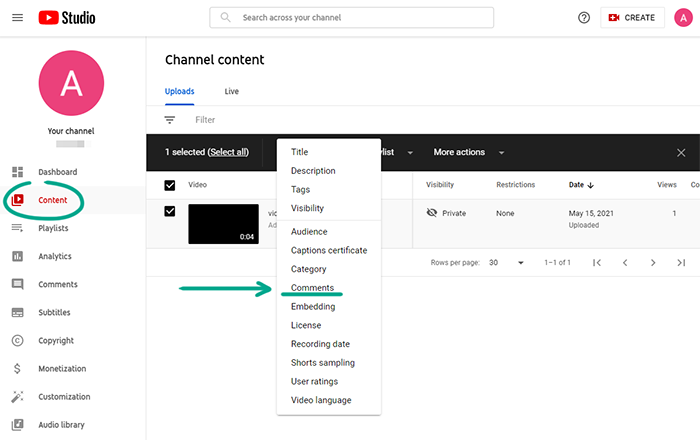
- Hold potentially inappropriate comments for review — to independently check comments marked as suspicious by the built-in filters,
- Hold all comments for review — to independently check all comments,
- Turn off comments — to completely disable comments;
- Click Update videos.
