How to keep your account from getting hacked
What for: So you don't get hacked.
If you are using a short and simple password for your Instagram account, cybercriminals can guess it and hijack your account. A long and complex password is more secure. Use a strong password that:
- Is at least 8 and up to 20 characters long;
- Contains lowercase and uppercase letters, numbers, and special characters ($, @, etc.);
- Is not an actual word or easy-to-guess phrase;
- Is not the same as your passwords for any other accounts;
- Does not consist of information that strangers could easily find out (your name, date of birth, pet's name, and so forth — or those of your friends or relatives).
To change your password:
- Go to your profile and tap the menu icon in the upper right corner of the screen;
- Select Settings;
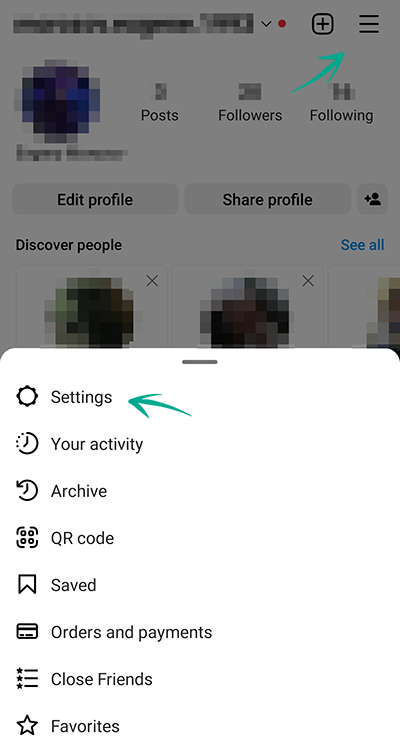
- Go to the Security section;
- Select Password;
- If the system sent you an e-mail to the e-mail address linked to your account, please follow the instructions listed in it;
- If the form for changing the password opens, enter the old password and then enter the new password twice;
- Tap the confirmation icon in the upper right corner of the screen.
What for: So you definitely don't get hacked.
Instagram can prompt you to enter an additional one-time code when you log in to the account. Even if cybercriminals find out your login and password, they will not be able to use them without this code. The code can be received via a text message or using an authentication app.
Keep in mind that Instagram can use the phone number you specified for one-time codes for its own purposes, for example to show you targeted ads.
To enable two-factor authentication:
- Go to your profile and tap the menu icon in the upper right corner of the screen;
- Open Settings;
- Go to the Security section;
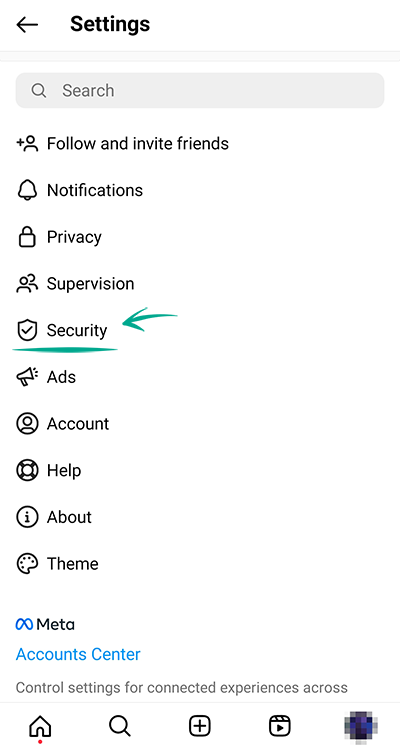
- Select Two-Factor Authentication;
- Tap Get Started and choose a method for receiving the one-time code:
- Text message to phone:
- Instagram will send a code to the phone number linked to the account. Enter it in the window that opens and tap Next;
- Code generated by another application, such as Kaspersky Password Manager or Google Authenticator;
- Tap Next step. The application you have chosen will start — follow the instructions in it and generate the code at the end;
- Go back to Instagram, tap Next, enter and confirm the code and tap Done.
Please note that attackers can intercept SMS with a password by infecting a smartphone with malware or taking advantage of a communication protocol vulnerability. Therefore it is safer to use the application for authentication.
After enabling two-factor authentication, you can specify an additional verification method:
- In the Two-factor authentication section, select Additional Methods;
- Enable the Login Requests option to receive notifications for approving new devices in the app;
- Select Backup Codes and save the suggested codes in a safe place if you have not done so before.
What for: To detect and stop any suspicious activity before it's too late.
You can view information about all of your account activity and take steps when you detect suspicious activity.
To view the login history and other data of your account:
- Go to your profile and tap the menu icon in the upper right corner of the screen;
- Open Settings;
- Go to the Security section;
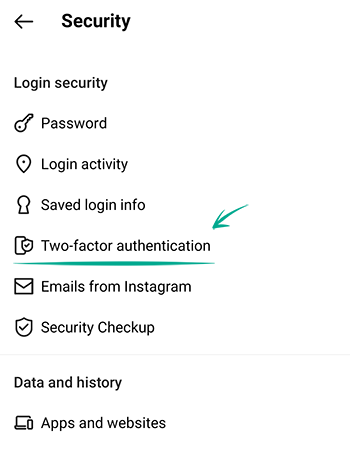
- Select Login activity;
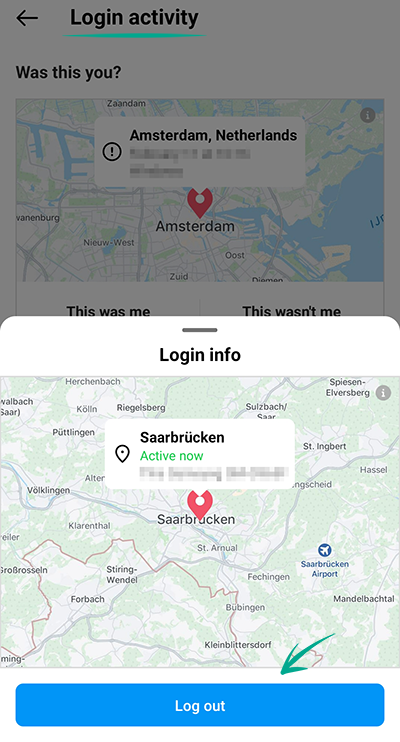
- Study the active sessions and, if you notice unfamiliar inputs, tap the three dots to the right of the session and then Exit.
What for: To prevent the loss of one account from causing the loss of all other accounts.
Instagram lets you link your account to profiles on other Meta platforms. This lets you automatically share your posts on other social networks. If cybercriminals hack your Instagram account, they will be able to publish posts on your behalf on related networks. Meanwhile, if cybercriminals find out the login and password for your Facebook account, they will be able to hijack your Instagram account.
To disable cross-publication of entries between your accounts:
- Go to your profile and tap the menu icon in the upper right corner of the screen;
- Open Settings;
- Go to the Account settings section at the bottom of the page;
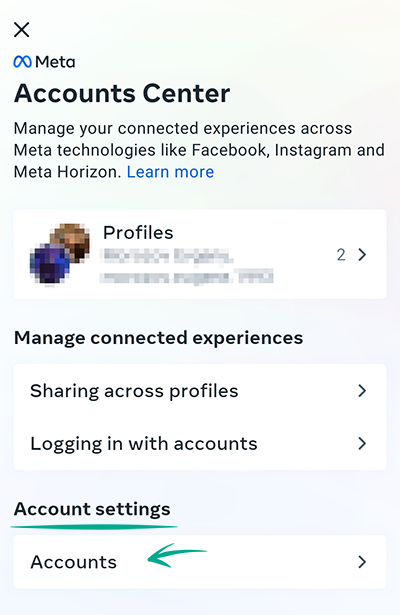
- Select Publish content to multiple profiles;
- Tap connected Instagram profile and in the profile window that opens, disable the options Your Story, Your Posts, and Your Reels videos in the Instagram app (only for Instagram).
To disable logging in to accounts with data from other Meta accounts:
- Go back to the Meta Account Center and select Sharing across profiles;

- Select the option Select accounts with which you can log in to other accounts;
- Select each account separately and uncheck the accounts of other services in the window that opens.
You can also delete an account from the Meta account center — this will not delete the accounts of individual services, but will just disconnect them from each other and will not allow you to use cross-service functions:
- Go back to the Meta Account Center and tap Accounts;
- Tap the Delete button next to any account;
- Then select Remove Account and tap Continue;
- Tap Delete Account .
Downside: Disabling cross-service functions and deleting a Meta account will prevent you from sharing posts simultaneously in several services. You will also no longer be able to restore access to Instagram using your Facebook profile.
What for: So nobody else can log in to your account.
Instagram lets you save account login credentials on the device so you don't have to enter the login and password every time. If your phone or tablet ends up in the hands of strangers, other people can access your account. To prevent this from happening, you can remove such data from the device.
To remove saved login credentials:
- Go to your profile and tap the menu icon in the upper right corner of the screen;
- Open Settings;
- Make sure you remember your login and password well and then tap Log Out;

- If the app prompts you to save login credentials, this means that Instagram has not saved them yet. You may choose not to log out and continue using Instagram;
- If you do not see a window with a message prompting you to save credentials, proceed to log out of the account. A page with your profile photo, Log in button and three dots will open;
- Tap the three dots and confirm that you wish to remove the data;
Log out of the account when you stop using Instagram;
When logging out of the account, clear the check mark to the left of Remember my login info or tap Not Now in the window prompting you to save login credentials.
Downside: You will have to enter your login and password manually.
How to keep corporations out of your business
What for: So Instagram does not know more than it needs to.
Instagram requests the contact list of your phone to help you locate the people you know on the social network. The service also collects information about your contacts to generate targeted ads and form the news feed. Since such data is passed on to others, including third parties, there is an increased risk of data leaks.
If you previously gave the app access to your contacts, revoke the permission:
- Open Settings on your device;
- Go to the section with the list of applications;
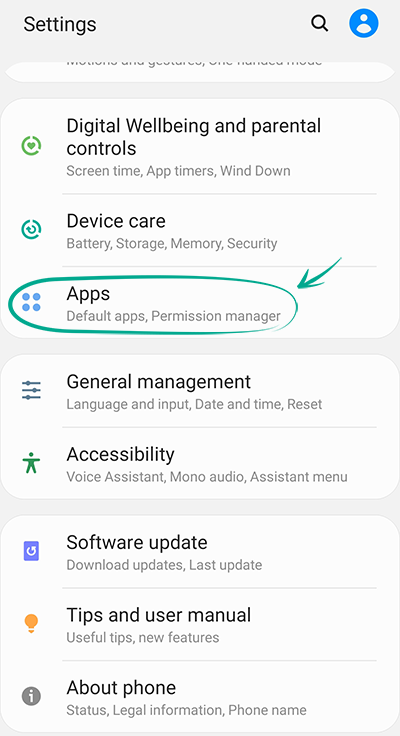
- Tap See all apps and select Instagram in the list;
- Tap Permissions;
- Select Contacts;
- Tap Disable.
Downside: Without access to the contact list, Instagram will no longer be able to advise you to follow the accounts of your friends in your contact list.
If such apps as Facebook, Messenger or WhatsApp, which are owned by Facebook, have access to the contact list, this information can still be used by the social network.
Keep in mind that you have to disable access to contacts on all your devices with contact lists.
You can check which contacts are already uploaded to your accounts and remove any unwanted information here:
What for: So Facebook does not know where you go.
Instagram tracks your location in order to suggest geotags for your posts, generate targeted ads, and suggest hangouts. Transmission of such data compromises your privacy, increases traffic usage and drains the battery. You can stop Instagram from accessing GPS data of the device.
To stop Instagram from tracking your location:
- Open Settings on your device;
- Go to the section with the list of applications;
- Tap See all apps and select Instagram in the list;
- Tap Permissions;
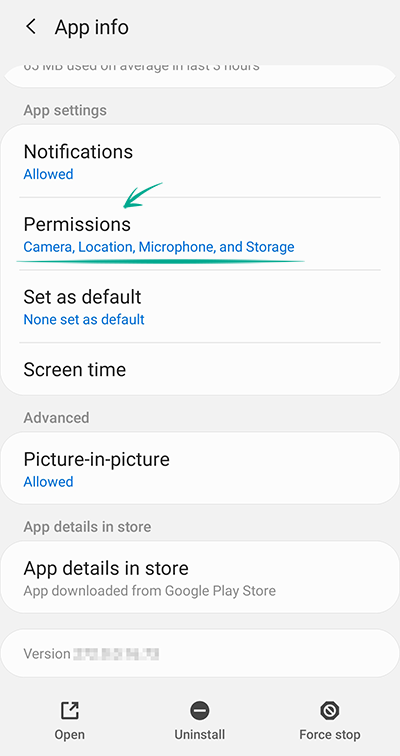
- Select Location;
- Tap Disable.
What for: To prevent potential data leaks.
If you connected other sites and apps to Instagram (e.g., to find subscribers, calculate likes and so on), they may have access to your profile info, images and videos you posted, lists of followers and follows. In some cases they may also be able to like posts and follow or unfollow accounts on your behalf.
When requesting access, such sites and apps do not normally inform you explicitly about the permissions you grant them.
To rule out any unauthorized activity in your account and lower the risk of data leaks, deny third-party apps and sites access to your data.
To revoke the access of apps to your account:
- Go to your profile and tap the menu icon in the upper right corner of the screen;
- Open Settings;
- Go to the Security section;
- Select the Apps and Websites tab;
- Delete all applications from the Active tab.
What for: So advertisers have less information with which to manipulate you.
Instagram may use information from advertisers and other partners about your activity on their websites and apps, as well as about some offline interactions (in particular, purchases). If such targeted advertising bothers you, disable it:
- Go to your profile and tap the menu icon in the upper right corner of the screen;
- Open Settings;
- Go to the Ads section;
- Tap Activity infomation from ad partners;

- Disable the Use data from partners option.
You will still see ads, but they will not be based on your personal data from Instagram partners.
How to defeat spammers and trolls
What for: To remove irrelevant comments.
By default, all Instagram users can leave comments under your posts, which is a feature that is often abused by spammers and trolls.
To limit comments on all future posts:
- Go to your profile and tap the menu icon in the upper right corner of the screen;
- Open Settings;
- Go to the Privacy section;
- Select Comments;
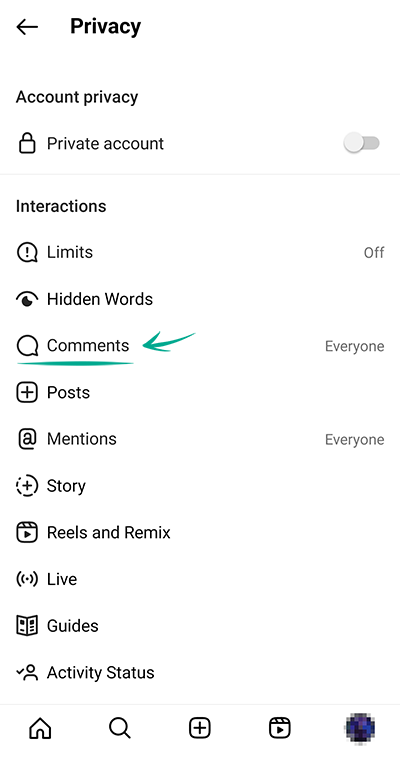
- Open the Allow Comments from... menu and select who can comment on your posts:
- Everyone;
- People You Follow;
- Your Followers;
- Your subscribers and followers.
You can also stop specific users from commenting on your posts:
- Go back to the Comments page and open the Block Comments from menu;
- Enter the user's name and tap Block to the right of their profile.
If you have a private account, only approved followers can comment on your posts.
You can also stop users from commenting on existing posts or specific new posts:
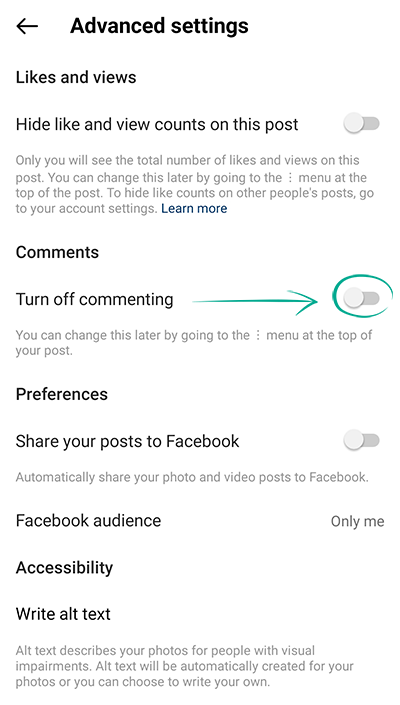
- When creating a new post, tap Advanced Settings;
- Enable the Turn Off Commenting option.
To disable comments under a post that has been already published:
- Go to your profile;
- Open the relevant post;
- Tap the three dots icon next to your name;
- Select Turn Off Commenting.
What for: To save you a lot of trouble.
By default, Instagram blocks potentially offensive comments using a built-in filter. You can also enable additional filters and add your own list of banned words, phrases, numbers, and emojis.
To hide offensive comments and messages:
- Go to your profile and tap the menu icon in the upper right corner of the screen;
- Open Settings;
- Go to the Privacy section;
- Select Hidden Words (if an additional screen appears, tap Continue);
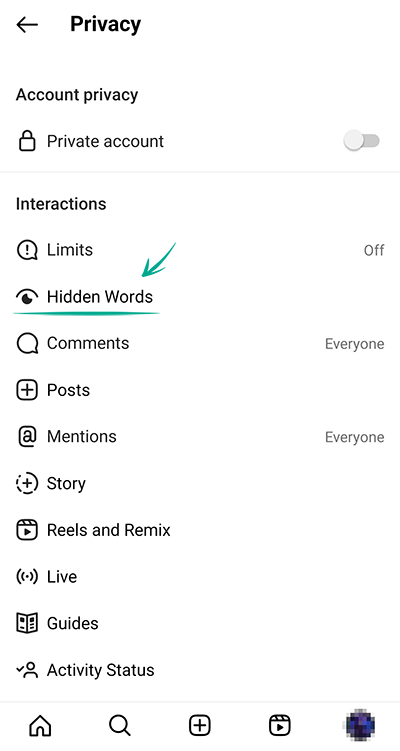
- Turn on the following options:
- Hide Comments in the Harmful and Offensive Comments and Messages section — to enable the built-in Instagram filter (the feature is enabled by default);
- Advanced Comment Filtering — for even more thorough filtering of comments under your posts;
- Hide Comments in the section Certain words in messages and comments — to add your own forbidden words, phrases, numbers and emojis to the filter;
- Tap Manage lists of words and phrases;
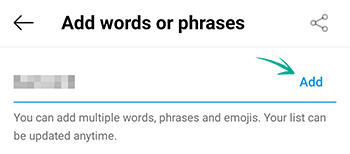
- In the input field, enter the comma-separated words, emojis and numbers that you don't want to see in the comments under your posts, and tap Add on the right;
- To hide correspondence requests containing offensive words, phrases and emojis, go back to the Hidden Words section and enable the two options Hide Message Requests in the Harmful and Offensive Comments and Messages sections and Certain Words in Messages and Comments;
- Finally, to hide unpleasant and offensive hashtags and captions, scroll down the page and enable the Hide Posts option;
- Then select Manage lists of words and phrases;
- Enter the words, phrases, emojis and numbers in the field that you would not like to see in other people's posts and tap Add.
What for: To avoid unpleasant people.
If you want to stop communicating with a specific user, you can block them. After blocking, you will automatically unsubscribe from each other (if you were subscribed), and all their likes and comments of/on your content will disappear. Blocked users will not be able to view your profile, comment your content, or send you private messages. In this case, the user will not know that you blocked them.
To block a user:
- Go to this user's page;
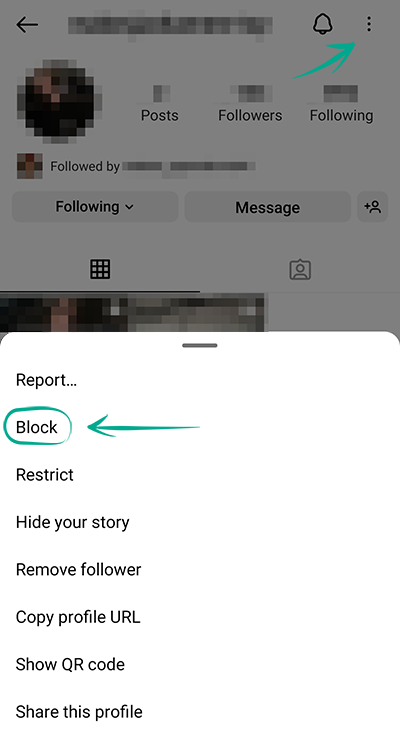
- Tap the three dots in the upper right corner of the screen;
- Tap Block or Block and Complain to confirm your decision;
- If you have chosen the second option, follow the on-screen instructions to indicate the reason for filing the report.
What for: So that trolls and advertisers don't bother you.
Instagram users can tag you in photos and videos in their posts. Such posts automatically appear on your profile and become visible to all users. If you don't want everyone to be able to tag you in their posts, disable this feature.
To limit the circle of people who can tag you in posts:
- Go to your profile and tap the menu icon in the upper right corner of the screen;
- Open Settings;
- Go to the Privacy section;
- Select Posts;
- In the section Who Can Tag You, select one of the items:
- People You Follow;
- Nobody.

You can also manually select posts where you were tagged by other users:
- On the same screen, tap Approve Tags Manually;
- Enable the Approve Tags Manually option and confirm your choice;
- There you can also adjust the visibility of posts, in which you were tagged earlier:
- Tap Edit next to Posts with Tags;
- Tap the posts you would like to hide or delete and tap the corresponding button at the bottom of the screen;
- Confirm your choice in the window that opens.
Other users can also tag you in their stories, comments, live broadcasts, and content captions. This function can also be used by ill-wishers and spammers. To protect yourself from this:
- Go to your profile and tap the menu icon in the upper right corner of the screen;
- Open Settings;
- Go to the Privacy section;
- Select Mentions;

- Select one of the following items:
- People You Follow;
- Nobody.
What for: To avoid spammers.
When someone sends you a private message for the first time, you first receive a message request from them, which is displayed in the corresponding tab of the personal messages screen. To start messaging with this person, you need to accept the message request first. However, you will still see the content of these requests, which you may not like.
To stop receiving message requests from strangers:
- Go to your profile and tap the menu icon in the upper right corner of the screen;
- Open Settings;
- Go to the Privacy section;
- Select Messages;
- Select Other Instagram Users and People on Facebook one by one and enable the Don`t Receive Requests option. If you have a Facebook account added, repeat these steps for the following items:

- Friends of Friends on Facebook;
- People who have your phone number.
Social network users can also add you to group chats (groups). This feature can be used by spammers. To stop receiving unwanted messages:
- In the Messages section, select Who can add you to groups;
- Select the option Only people you follow on Instagram.
What for: So that your followers don't upset you.
Let's say one of your followers started bothering you in comments or private messages, but for some reason you don't want or can't block them permanently. In this case, you can restrict a specific user from interacting with you and your account.
To protect yourself from prying or unpleasant followers:
- Navigate to the profile of the person with whom you would like to minimize interaction to a safe minimum;
- Tap the three dots in the upper right corner of the screen and select Restrict;
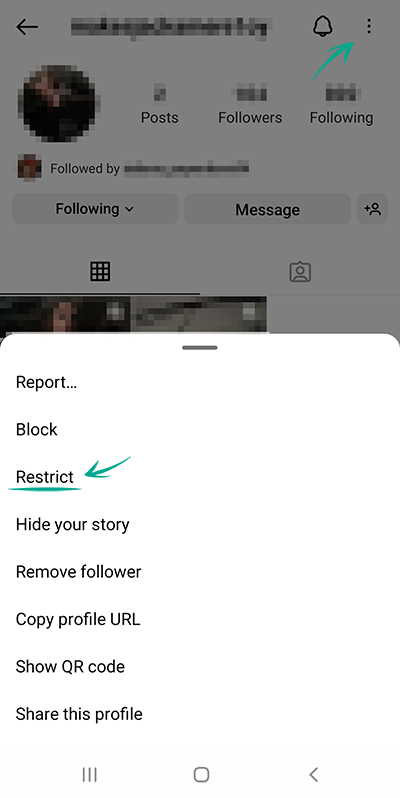
- Tap Close.
Now the comments of this person on your posts will be seen only by you and them, and for you they will be hidden until you decide that you want to read them. Your chat with this user will be hidden from the chat list, and the user will not know when you are online.
What for: So that you are not bothered by people you do not know.
By default, everyone who sees your stories can respond and react to them. Responses and reactions are displayed in personal messages, which means that if your stories are public, ill-wishers and advertisers can use this feature and flood you with spam and unpleasant messages.
To prevent strangers from responding to your stories:
- Go to your profile and tap the menu icon in the upper right corner of the screen;
- Open Settings;
- Go to the Privacy section;
- Select Story;
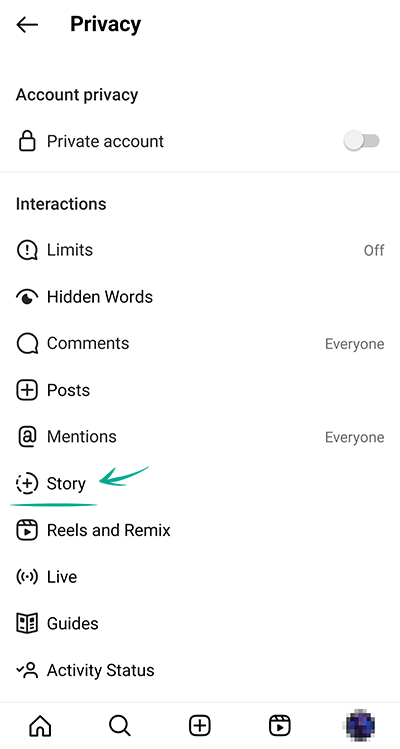
- In the Response section, select one of the following items:
- People whose updates you subscribe to;
- Disabled.
What for: To protect yourself from ill-wishers.
Modern social networks are full of all kinds of functions that simplify our communication with loved ones, that can diversify leisure time, and that even can help us run a business. But these opportunities can also be taken advantage of by ill-wishers and spammers. If unwanted or even offensive messages have ever been on under your posts, you know how unpleasant it is. To protect yourself from this in the future, limit the number of people who can send you private messages and leave comments on your posts:
- Go to your profile and tap the menu icon in the upper right corner of the screen;
- Open Settings;
- Go to the Privacy section;
- Select Limits and tap Continue;
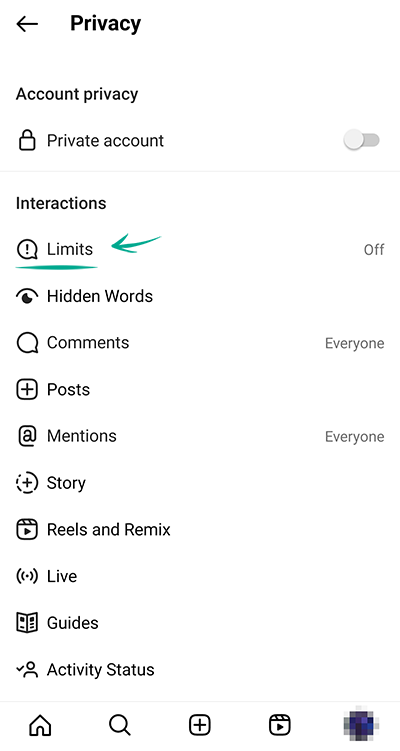
- Enable the options Accounts that are not subscribed to you and Recent Followers;
- Tap Limit for, select the maximum time frame and then tap Set Reminder. After this time, Instagram will remind you to turn this feature off;
- Tap Enable.
Comments and messages from these user groups will be hidden until you approve them.
What for: To avoid unwanted reactions to your photos and videos.
When you post photos and videos, other users can add them to their Reels videos — this feature is called "Remixes". Ill-wishers can use this feature to show you in a bad light or ruin your reputation.
To make sure this doesn't happen, disable the feature that allows remixing your posts:
- Go to your profile and tap the menu icon in the upper right corner of the screen;
- Open Settings;
- Go to the Privacy section;
- Select Reels and Remixes;
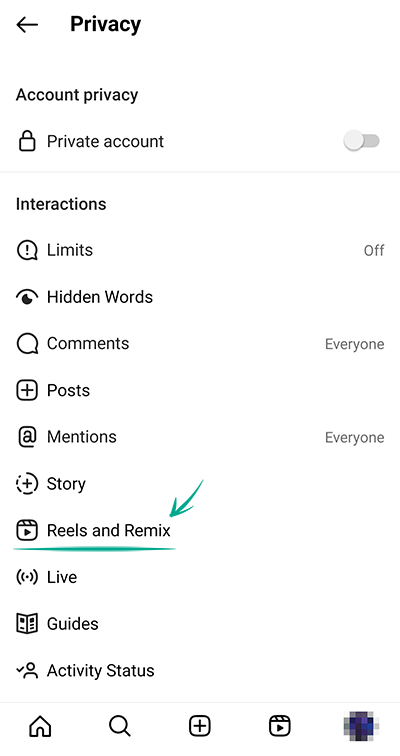
- Turn off the following options:
- Allow for Video Reels;
- Allow for videos from the feed;
- Allow for photos;
- Recommend on Facebook.
Note that previously created remixes with your content will remain on Instagram until you delete the specific post. If you restore this post within the next 30 days, its remixes will also be restored.
You can also disable remixing individual posts:
- Choose your Reels video or photo;
- Tap the three dots in the lower or upper right corner of the post;
- Select Turn off remixes;
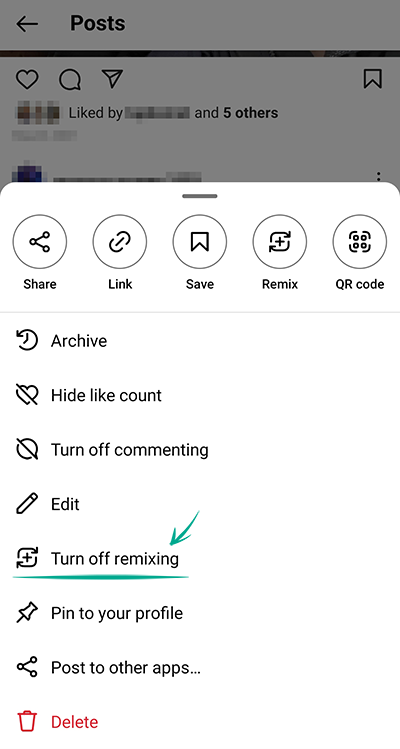
- Tap Disable.
How to hide posts from unwanted people
What for: So that only your close friends have access to your stories.
By default, your stories are visible to all followers. However, you can stop specific users from viewing them. This can be helpful if you use stories to post personal photos and videos that you do not wish to share with everybody.
To configure the visibility of stories:
- Go to your profile and tap the menu icon in the upper right corner of the screen;
- Open Settings;
- Go to the Privacy section;
- Select Story;
- Tap the number of people next to Hide Story From;

- In the window that opens, select the followers from whom you want to hide your stories.
You can also show your stories only to a limited number of followers added to the list of close friends.
To create or edit this list:
- In the Story section, select Close Friends;

- In the window that opens, select the followers you want to add to the list of close friends;
- Tap the Add button next to the followers you want.
To make a story visible only to close friends, while publishing the story tap the green icon with a star at the bottom of the screen.
What for: To keep your posts from being shared beyond the intended audience.
By default, other Instagram users can add your posts to their stories, as well as share them and your stories in private messages with other users. To stop others from using your posts:
- Go to your profile and tap the menu icon in the upper right corner of the screen;
- Open Settings;
- Go to the Privacy section;
- Select Story;
- Disable the following options in the Sharing section:
- Allow Sharing to Stories — to stop other users from adding your posts to their stories;
- Allow Sharing as Message — to stop other users from sharing your stories as messages;
- Share Your Story to Facebook — to stop automatic reposting of your story to Facebook.

How to prevent your personal data from being exposed
What for: To prevent cybercriminals from getting hold of your personal information.
By default, your posts are visible to all Instagram users. Search engines can also include your posts in search results. If your profile is public, information in posts can be used against you. For example, information about your personal life can help telephone fraudsters to make up a convincing story in order to steal money from your bank accounts.
You can make your account private to make your posts visible only to approved followers:
- Go to your profile and tap the menu icon in the upper right corner of the screen;
- Open Settings;
- Go to the Privacy section;
- In the Account Privacy section, enable the Private Account option;
- Tap Swith to Private.

Existing followers will still be able to see your posts. You can remove those followers with whom you do not want to share your posts:
- Go to your profile and tap the number of followers at the top of the screen;
- Find the user whom you want to remove, tap Remove next to their name, and confirm your choice.

The user will not be notified that you have removed him from the list of followers.
Keep in mind that when you share a post from a private Instagram account on a different social network, post visibility will depend on settings of this social network and not Instagram.
What for: So that your secrets are kept within your chats.
Some personal correspondence is more personal than others. If you share information with your interlocutor that is dangerous to leave in the chat, use the disappearing messages mode so that all your messages are deleted immediately after you leave the chat — for you and for all chat participants.
To enter the disappearing messages mode:
- On the main page of the application, tap the Direct button with the chat image in the upper right corner;
- Select the chat;
- Swipe up from the bottom of the screen. Chats with disappearing messages mode enabled will be marked in the conversation list with a dotted circle to the right of the user's name.
Remember that your interlocutors can take a screenshot of your messages and that disappearing messages can still be used to report users.
What for: To prevent cybercriminals from getting hold of them.
By default, Instagram stores in the memory of your device the photos and videos you take in the app. Such data can remain on your device even after you remove your Instagram post. There is a risk that cybercriminals may get hold of them should you lose your device.
To stop Instagram from saving photos and videos from the app in the device memory:
- Go to your profile and tap the menu icon in the upper right corner of the screen;
- Open Settings;
- Go to the Account section;
- Select Original Posts;
- Disable the options:
- Save Original Posts;
- Save Posted Photos;
- Save Posted Videos.

What for: To ensure that your removed posts actually get removed.
By default, your stories are available to followers for 24 hours, after which they are saved in the archive. If cybercriminals hack your account, they will be able to see posts that you believe to have been removed.
To disable data archiving:
- Go to your profile and tap the menu icon in the upper right corner of the screen;
- Open Archive. You will be taken to the Stories Archive tab;
- Tap the three dots button in the upper right corner of the screen and select Settings;
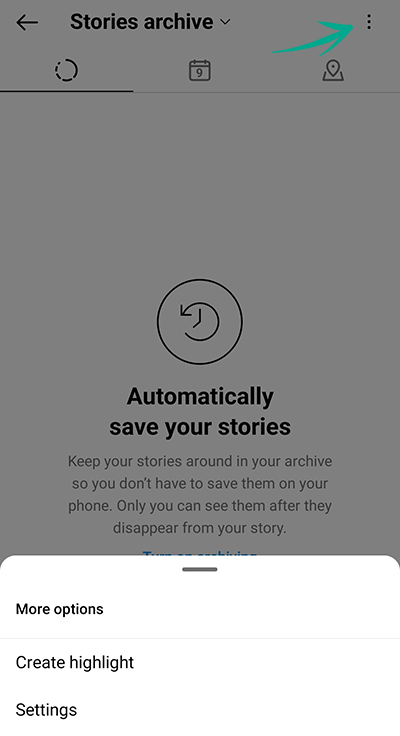
- Disable the Save Stories to Archive option;
- Go to your profile and tap the menu icon in the upper right corner of the screen;
- Open Settings;
- Go to the Privacy section;
- Select Live Broadcast;
- Disable the Save live broadcasts in the archive option.
Downside: If you lose access to your account, you will lose all your content.
What for: To stop showing everybody when you are online.
By default, Instagram shows when you are online or the last time you went online to your followers and users to whom you sent direct messages. Your ex-partners or other interested people could monitor your status and spam you with their messages when you are online.
Also, if you befriend people you don't know personally, this information could be used by an intruder to choose the best time to hack your account. By observing your status over a period of several days, they will see when you are likely to be offline and unable to respond promptly to an attack.
To stop showing your activity status:
- Go to your profile and tap the menu icon in the upper right corner of the screen;
- Open Settings;
- Go to the Privacy and Security section;
- Select Activity Status;

- Disable the Show Activity Status option.
Downside: By hiding your status you will also be unable to see the activity status of your followers.
What for: To make it more difficult to identify you on the social network.
Instagram does not require you to specify your accurate information. You can make your account anonymous if you don't want people to associate it with you:
- upload any image that makes it impossible to determine that the account belongs specifically to you as your profile photo;
- use an alias;
- remove information about yourself and the link to your website if you specified them previously.
To change the profile photo:
- Go to your profile;
- Tap Edit Profile, and then Edit picture or avatar;
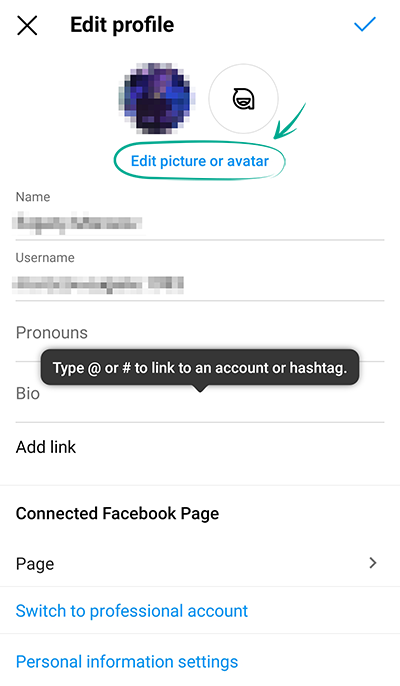
- Select New Profile Photo and upload an image.
To change your username or remove your details:
- Go to your profile;
- Tap Edit Profile;
- Enter made-up information in the Name and Username fields;
- Remove unnecessary information from the bio;
- Tap the text in the Bio section and erase it in the window that opens;
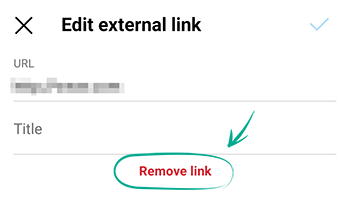
- Remove unnecessary links;
- Tap the Links section;
- In the window that opens, tap the link you want to delete;
- Tap Remove Link and confirm your decision.
What for: To prevent unwanted people from finding your profile.
This feature is unavailable in the Android app. To stop your profile from appearing in recommendations for people with similar interests, follow the instructions on how to configure the Web version of Instagram.
How to hide unwanted content
What for: To see only what you like.
Instagram offers its users a ton of diverse content, but some posts can still be unpleasant, for example, they may contain scenes of violence or substance use. Such content is considered unacceptable by the platform by default, and you can reduce its volume.
To see as little inappropriate content as possible:
- Go to your profile and tap the menu icon in the upper right corner of the screen;
- Open Settings;
- Go to the Account section;
- Select Sensitive content control;

- Choose Less.
Now you will see less inappropriate content in search results, in the "Interesting" and Reels sections, as well as in your feed and on hashtag pages.
What for: To avoid distractions.
Instagram sends users push notifications and e-mails with ads.
To stop Instagram from sending ads via push notifications:
- Go to your profile and tap the menu icon in the upper right corner of the screen;
- Open Settings;
- Go to the Notifications section;
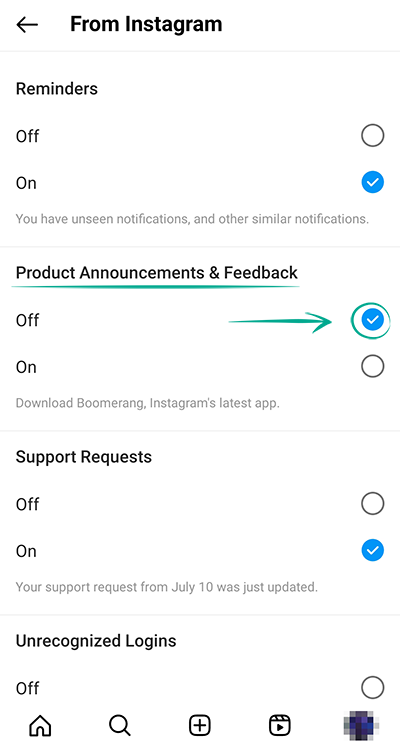
- Select From Instagram;
- Go to the Product announcements & feedback section and select Off.
To disable e-mail notifications:
- Go to your profile and tap the menu icon in the upper right corner of the screen;
- Open Settings;
- Go to the Notifications section;
- Select Messages;
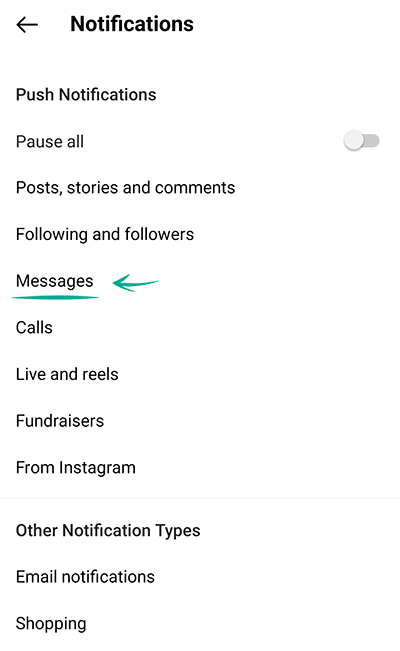
- Turn off:
- Product e-mails;
- News emails;
- Return to the Notifications section;
- Select Purchases;
- Turn off the Recommendations for you option.
How to clean up your traces
What for: Not to lose money.
Instagram users can spend money directly on the social network: for example, to buy ads. To this end, Instagram requests and stores details of a bank card or PayPal account. However, if your account gets compromised by a leak or gets hacked, your financial info can end up in the hands of cybercriminals.
To remove stored bank card and e-wallet data:
- Go to your profile and tap the menu icon in the upper right corner of the screen;
- Open Settings;
- Go to the Payments section. If you do not see this section, this means that you do not have any cards or accounts linked to your account;
- Select Payment Methods;
- Tap a card or PayPal account in the list and tap Remove.
Downside: After removing cards and accounts you will not be able to order ads or make purchases on Instagram. However, you can still buy goods on pages of stores if payment is processed on the merchant's website.
What for: To prevent information leaks.
When you follow external links on Instagram, its browser saves that information. If somebody gains access to your device, they can use the information to make inferences about your habits and preferences.
To clear the browsing history in Instagram, along with temporary files:
- Go to your profile and tap the menu icon in the upper right corner of the screen;
- Open Settings;
- Go to the Account section;
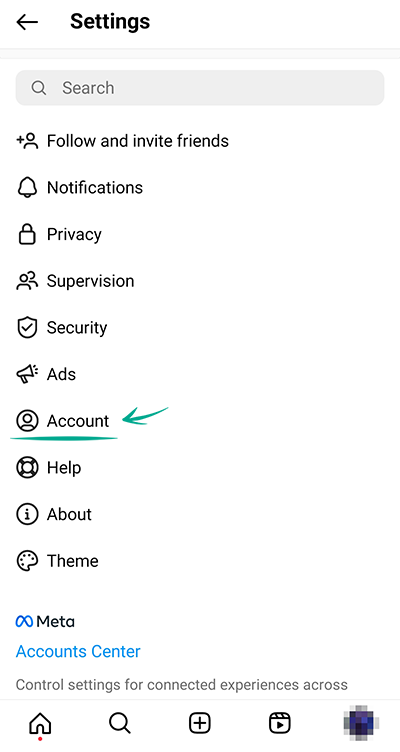
- Select Browser Settings;
- Tap the Clear button next to Browser Data and confirm your decision.


