How to keep your account from getting hacked
What for: So you don't get hacked.
If you are using a short and simple password for your Instagram account, cybercriminals can guess it and hijack your account. A long and complex password is more secure. Use a strong password that:
- Is at least 8 and up to 20 characters long;
- Contains lowercase and uppercase letters, numbers, and special characters ($, @, etc.);
- Is not an actual word or easy-to-guess phrase;
- Is not the same as your passwords for any other accounts;
- Does not consist of information that strangers could easily find out (your name, date of birth, pet's name, and so forth — or those of your friends or relatives).
To change your password:
- Click More in the lower left corner of the screen;
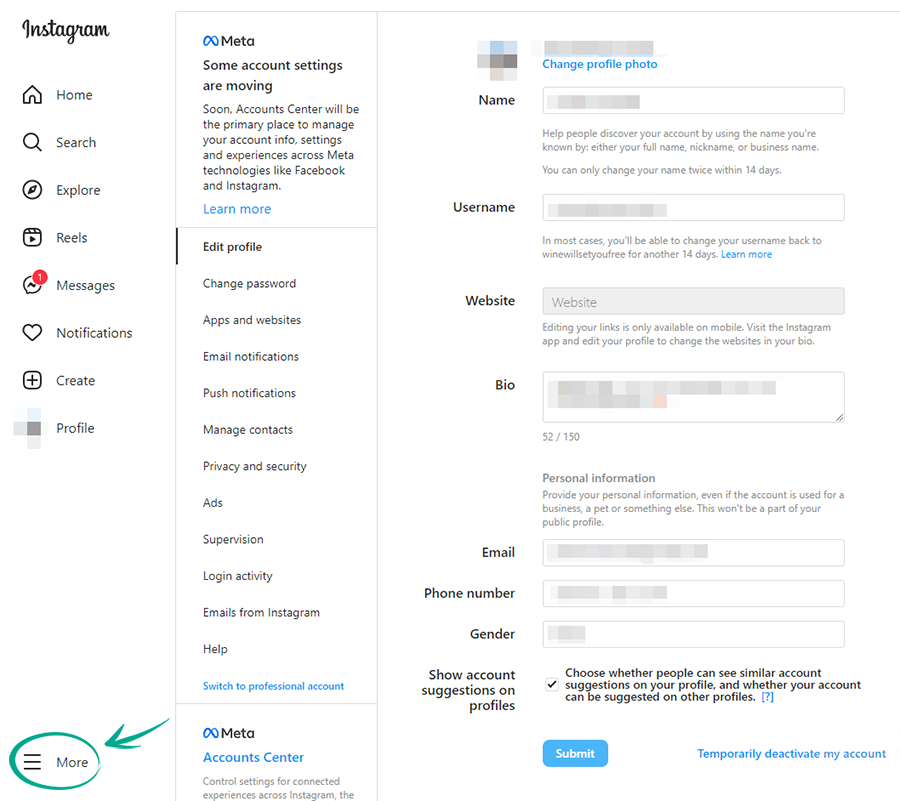
- Select Settings;
- Select the Change Password tab;
- Enter your current password and print a new one twice;
- Click Change password.
What for: So you definitely don't get hacked.
Instagram can prompt you to enter an additional one-time code when you log in to the account. Even if cybercriminals find out your login and password, they will not be able to use them without this code. The code can be received via a text message or using an authentication app.
Keep in mind that Instagram can use the phone number you specified for one-time codes for its own purposes, for example to show you targeted ads.
To enable two-factor authentication based on your phone number:
- Click More in the lower left corner of the screen;
- Select Settings;
- Select the Privacy and Security tab;
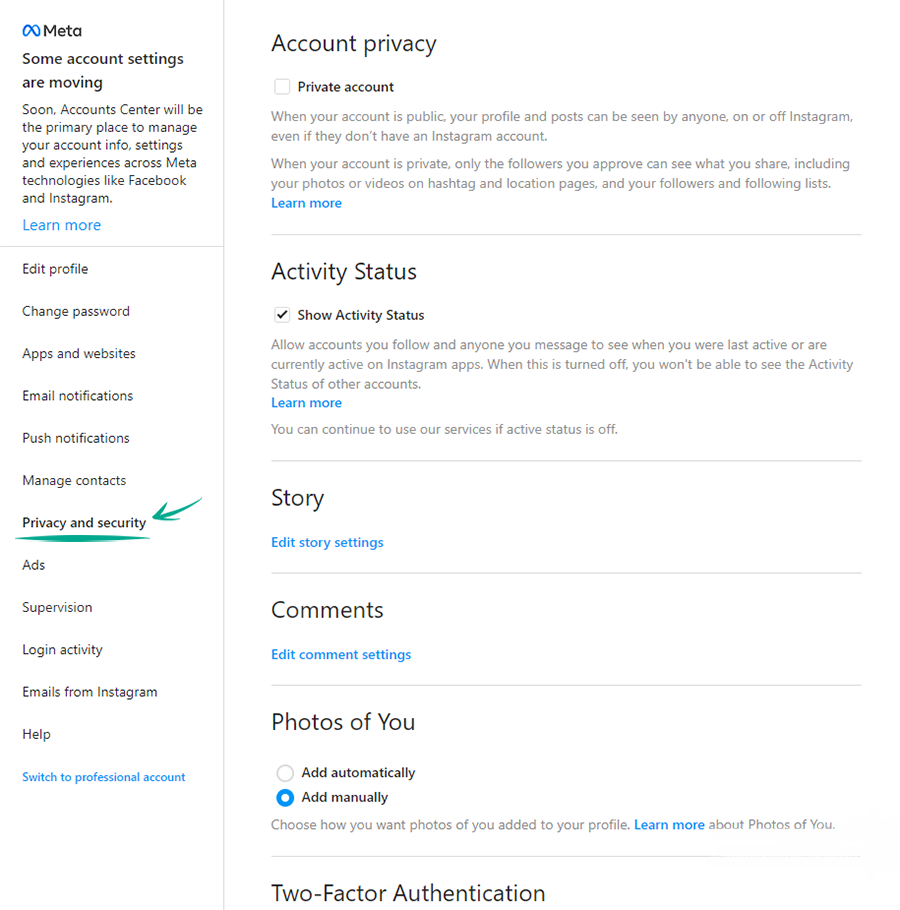
- In the Two-Factor Authentication section, click Edit Two-Factor Authentication Setting;
- Select Use Text Message to receive the verification code by text message;
- Select Turn On in the dialog that opens;
- Check the phone number used to receive the text message, edit it and click Next, if appropriate;
- Enter the confirmation code you receive by text message and click Ready.
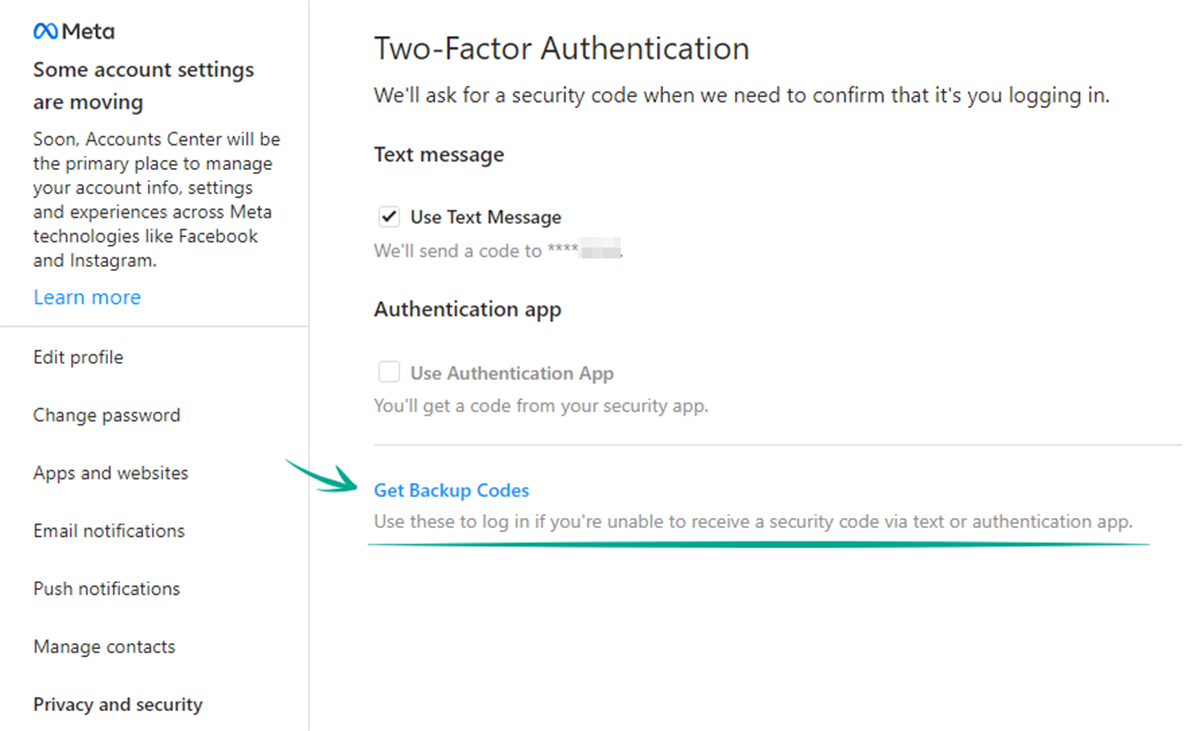
In order not to lose your account in case you lose your phone number, save the backup codes:
- On the same page, click Get Backup Codes;
- Instagram opens a page with five backup recovery codes. Every code can be used only once. Write them down or take a screenshot of them, and keep this information in a safe place.
It is considered that safer to use an authentication app for two-factor authentication. A text message with the code can be intercepted by infecting the smartphone with malware or by exploiting a communication protocol vulnerability.
The Web version of the service currently does not allow enabling two-factor authentication using a 2FA app. To do so, open the settings of the Instagram app for iOS or Android.
What for: To detect and stop any suspicious activity before it's too late.
You can view information about all of your account activity and take steps when you detect suspicious activity.
To view the login history and other data of your account:
- Click More in the lower left corner of the screen;
- Select Settings;
- Select the Login activity tab;
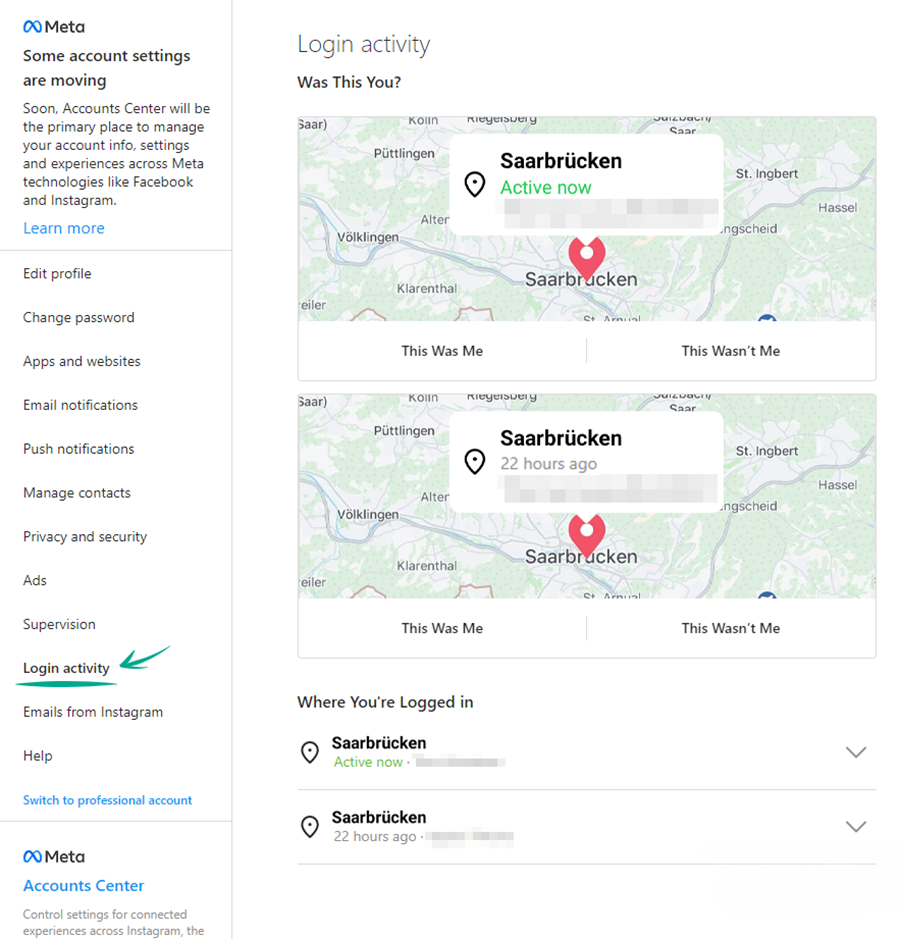
- Study active sessions and, if any unfamiliar entries, select a session and click Log Out.
What for: To prevent the loss of one account from causing the loss of all other accounts.
Instagram lets you link your account to profiles on other Meta platforms. This lets you automatically share your posts on other social networks. If cybercriminals hack your Instagram account, they will be able to publish posts on your behalf on related networks. Meanwhile, if cybercriminals find out the login and password for your Facebook account, they will be able to hijack your Instagram account.
To disable posting in several social networks at the same time:
- Click More in the lower left corner of the screen;
- Select Settings;
- In the lower left corner of the settings window, select the Account Center section;
- Select Sharing across profiles;
- Click the connected profile and in the window that opens, disable the options Your story and Your posts.
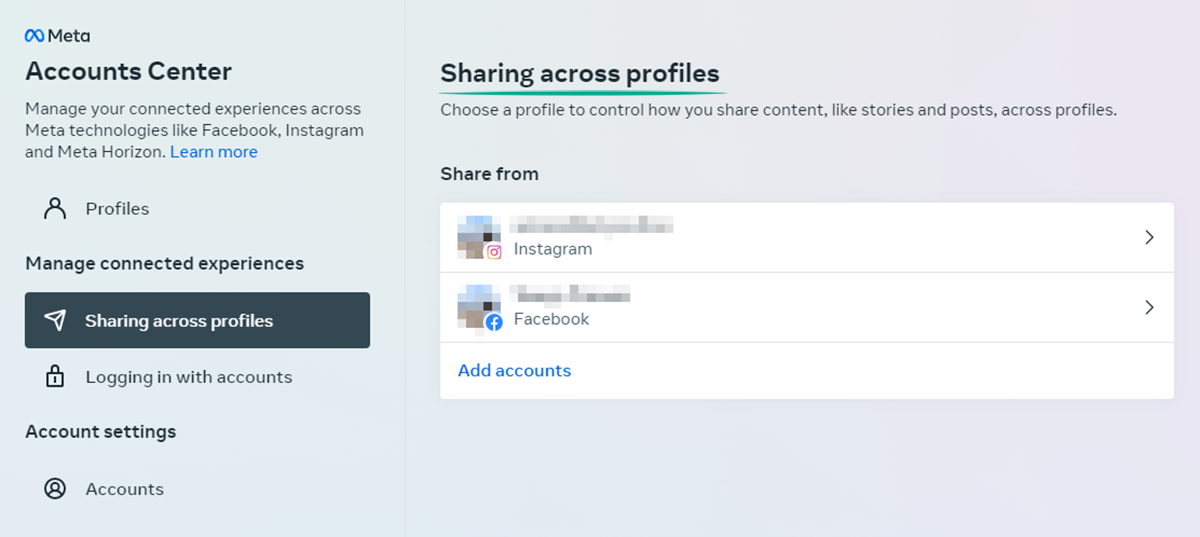
To disable logging in to accounts with data from other Meta accounts:
- Go back to the Meta Account Center and select Logging in with accounts;
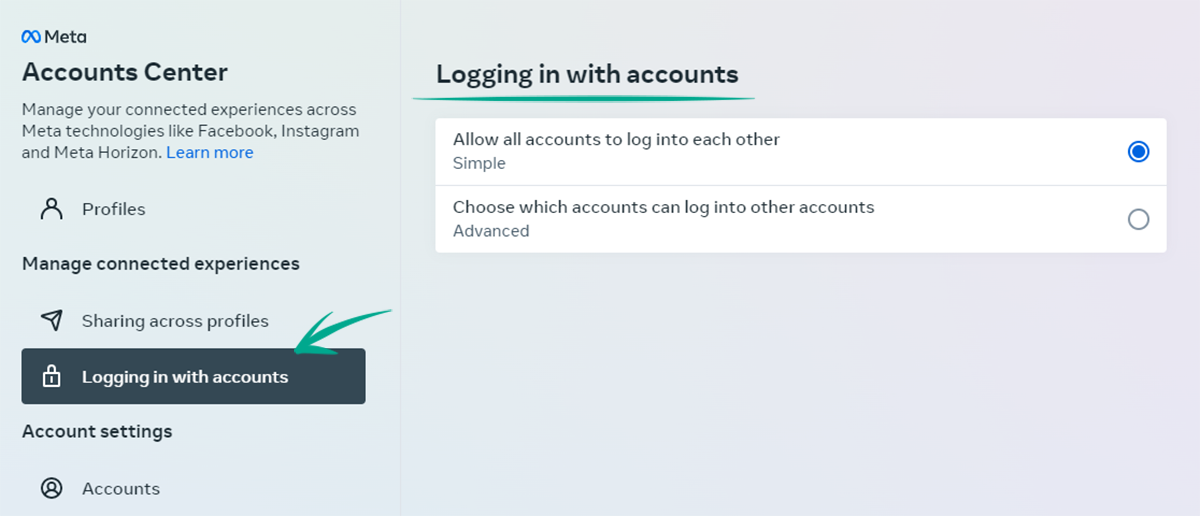
- Select the option Select accounts with which you can log in to other accounts;
- Select each account separately and uncheck the accounts of other services in the window that opens.
You can also delete an account from the Meta account center — this will not delete the accounts of individual services, but will just disconnect them from each other and will not allow you to use cross-service functions:
- Click Accounts in the menu on the left;
- Click the Remove button next to any account and click Continue;
- Click Delete Account.
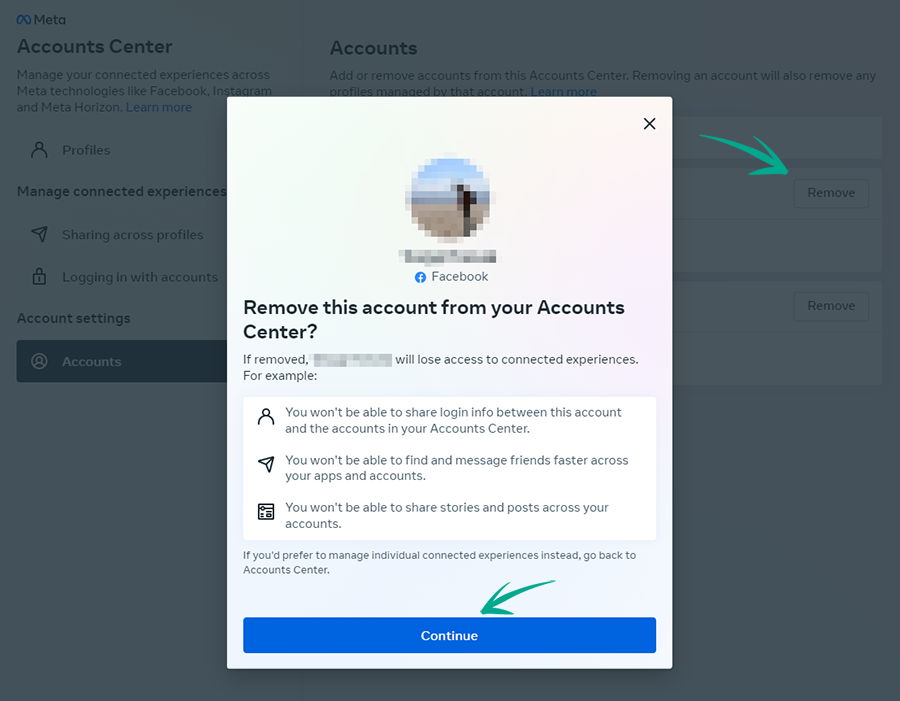
Downside: Disabling cross-service functions and deleting a Meta account will prevent you from sharing posts simultaneously in several services. You will also no longer be able to restore access to Instagram using your Facebook profile.
How to keep corporations out of your business
What for: So Instagram does not know more than it needs to.
If you enabled contact syncing in Instagram for iOS or Android, the social network uses your contacts to suggest you to follow accounts of people you know or to create targeted ads. Such data is passed on to others, including third parties, leading to an increased risk of data leaks.
To remove contact information:
- Click More in the lower left corner of the screen;
- Select Settings;
- Select the Manage Contacts tab;
- Click Delete All.
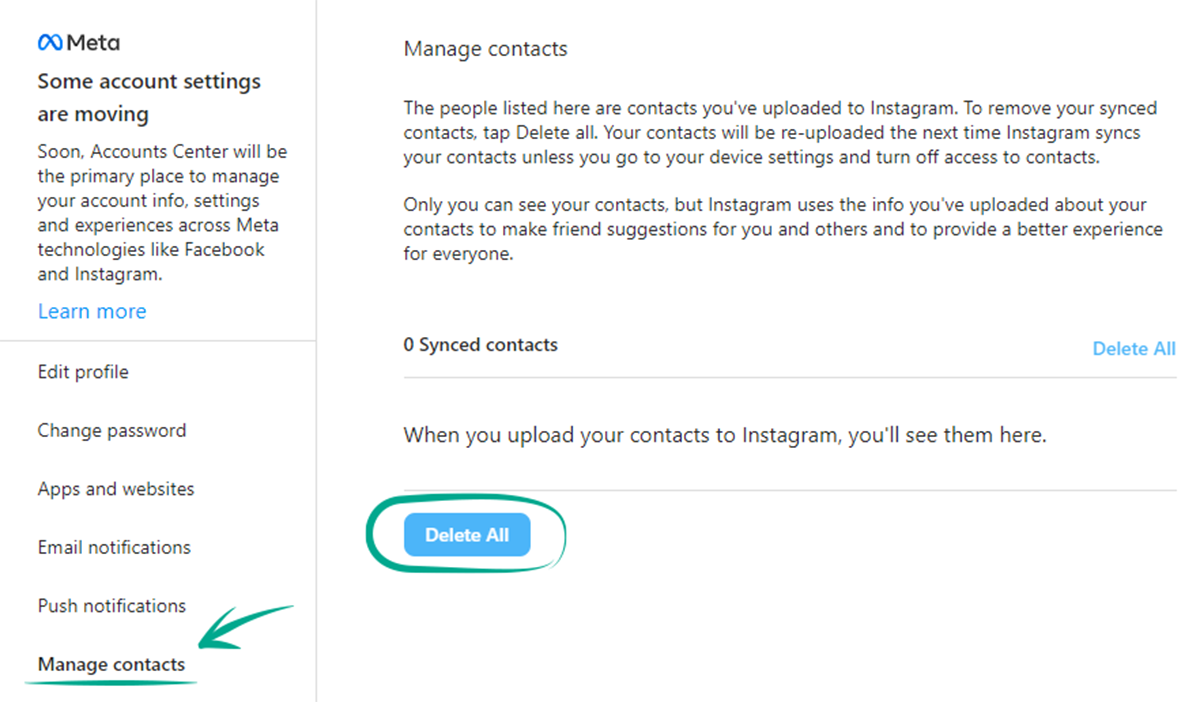
Note that without access to the contact list, Instagram will no longer be able to recommend the accounts of your friends whose numbers are in your smartphone contact list.
What for: To prevent potential data leaks.
If you connected other sites and apps to Instagram (e.g., to find subscribers, calculate likes and so on), they may have access to your profile info, images and videos you posted, lists of followers and follows. In some cases they may also be able to like posts and follow or unfollow accounts on your behalf.
After being granted access, such sites and apps do not normally inform you explicitly about the permissions you grant them.
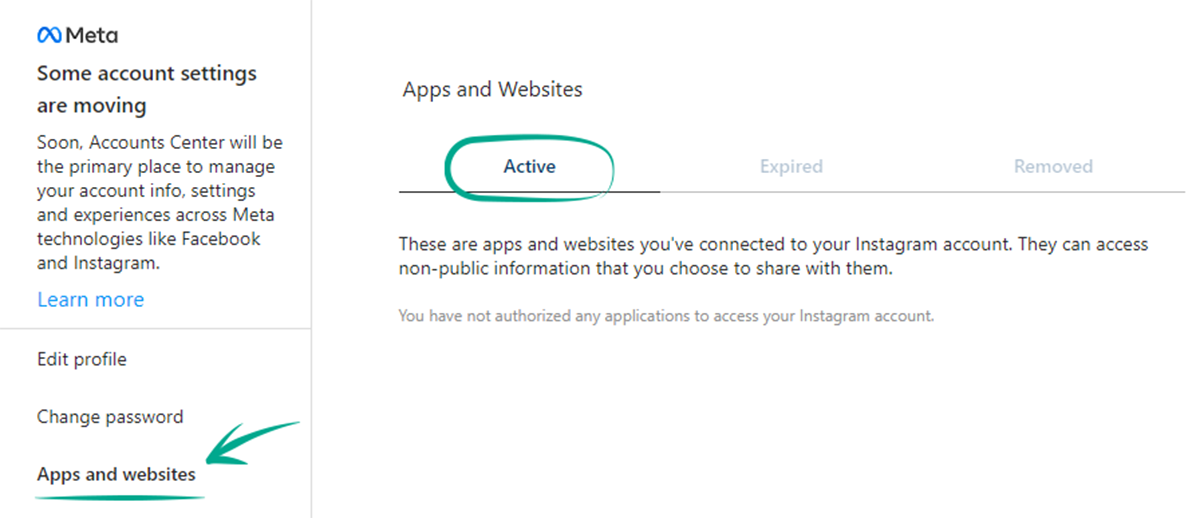
To rule out any unauthorized activity in your account and lower the risk of data leaks, deny third-party apps and sites access to your data.
To revoke the access of apps to your account:
- Click More in the lower left corner of the screen;
- Select Settings;
- Select the Apps and Websites tab;
- Delete all applications from the Active tab.
What for: So advertisers have less information with which to manipulate you.
Instagram may use information from advertisers and other partners about your activity on their websites and apps, as well as about some offline interactions (in particular, purchases). If such targeted advertising bothers you, disable it:
- Click More in the lower left corner of the screen;
- Select Settings;
- Go to the Ads section;
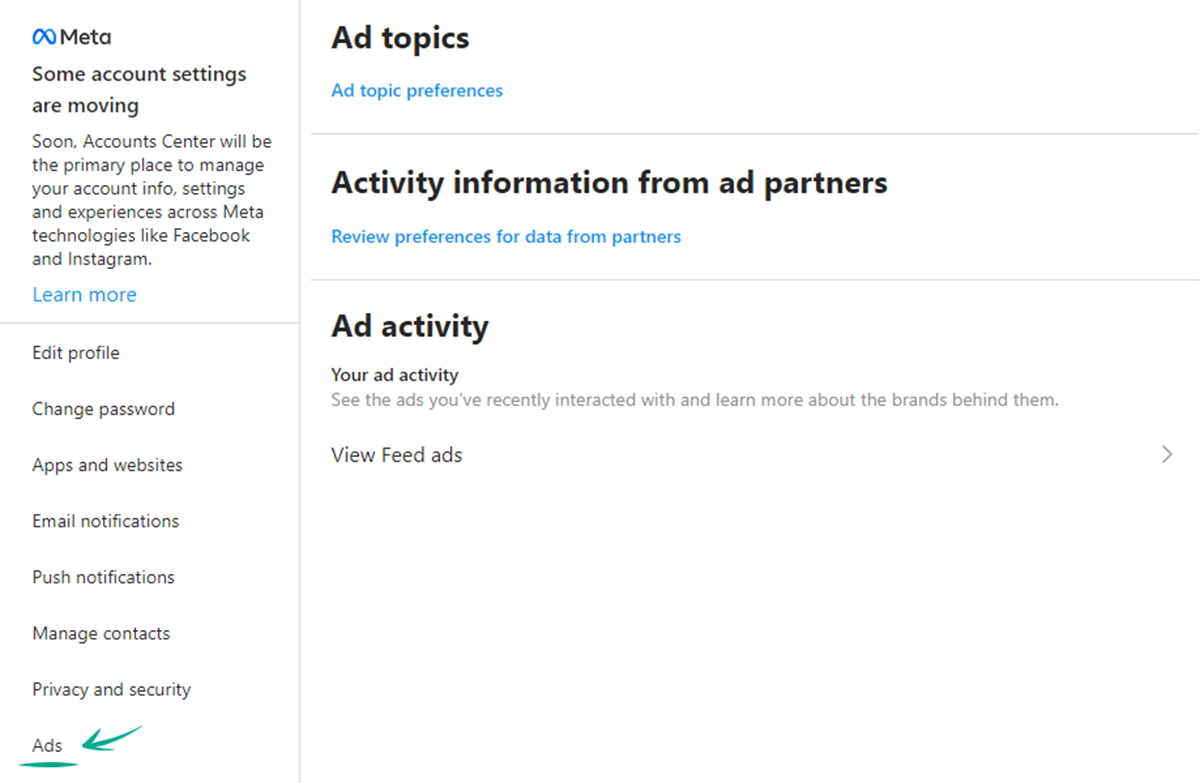
- In the Information about actions from advertising partners section, click View preferences for data from partners;
- Click Check Settings;
- Click No, don't make my ads more useful by using this information and then click Confirm;
- Disable the Use data from partners option.
You will still see ads, but they will not be based on your personal data from Instagram partners.
How to defeat spammers and trolls
What for: To remove irrelevant comments.
By default, all Instagram users can leave comments under your posts, which is often abused by spammers and trolls.
To limit comments on all future posts:
- Click More in the lower left corner of the screen;
- Select Settings;
- Go to the Privacy and security section;
- Click Edit Comment Settings in the Comments section;
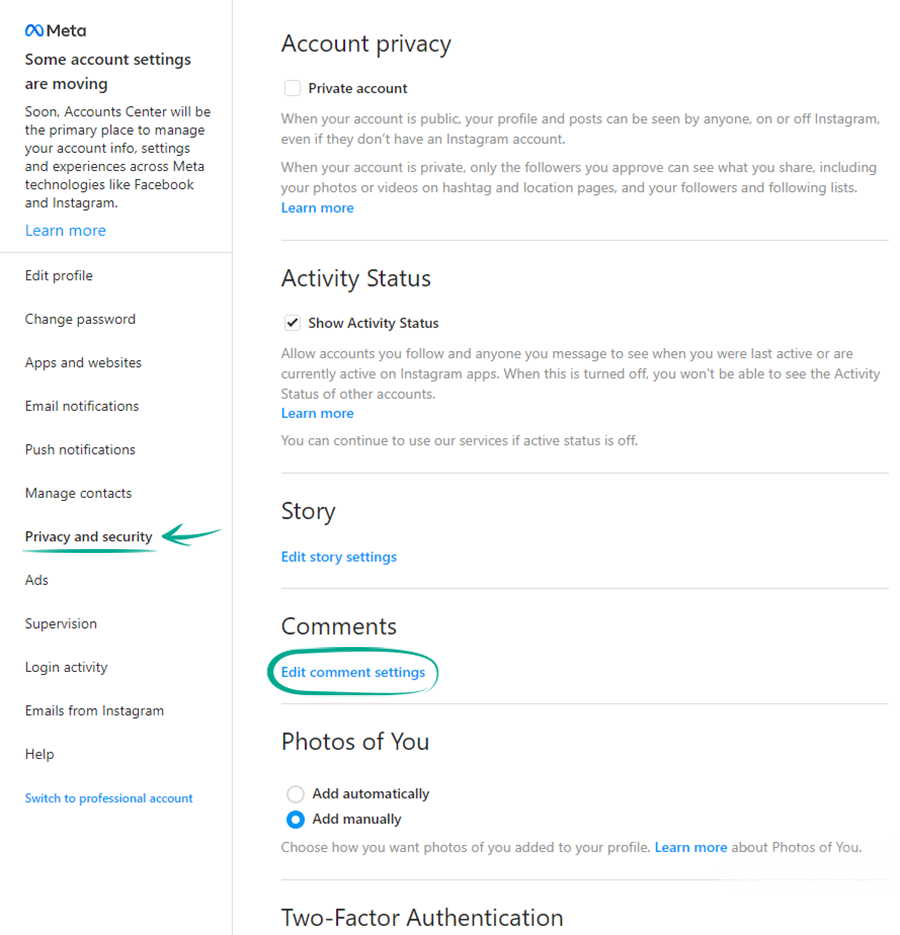
- Click Allow comments from... and mark those who can comment on your posts:
- Your Followers;
- People You Follow;
- Your subscribers and followers.
If you have a private account, only approved followers can comment on your posts.
You can also stop users from commenting on existing posts or specific new posts:
- When creating a new entry after selecting the filter, click Advanced Settings;
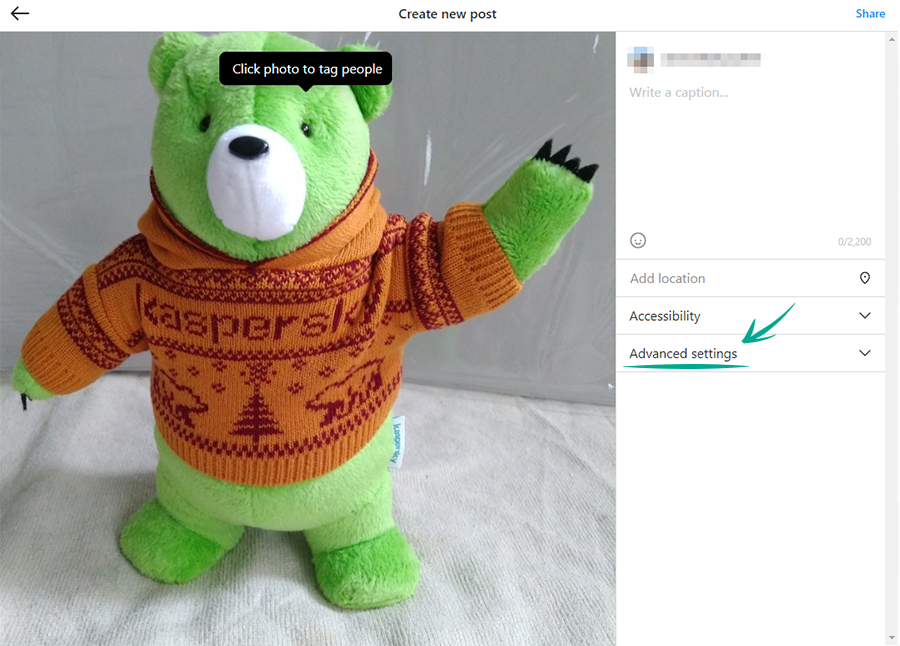
- Enable the Turn Off Commenting option.
To disable comments under a post that has been already published:
- Go to your profile;
- Open the relevant post;
- Click the three dots icon next to your name;
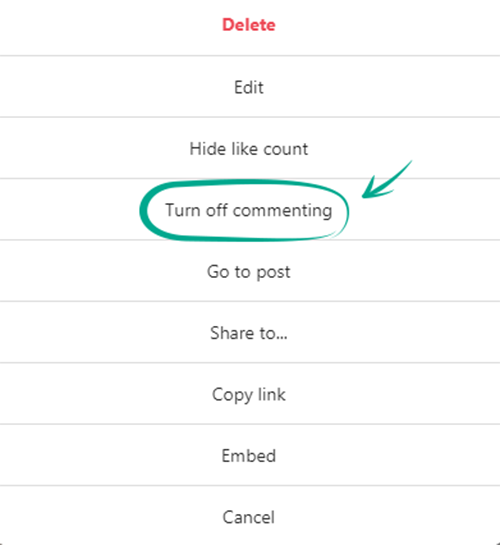
- Enable the Turn Off Commenting option.
What for: To save you a lot of trouble.
By default, Instagram blocks potentially offensive comments using a built-in filter. You can also enable additional filters and add your own list of banned words, phrases, numbers, and emojis.
To hide offensive comments and messages:
- Click More in the lower left corner of the screen;
- Select Settings;
- Go to the Privacy and security section;
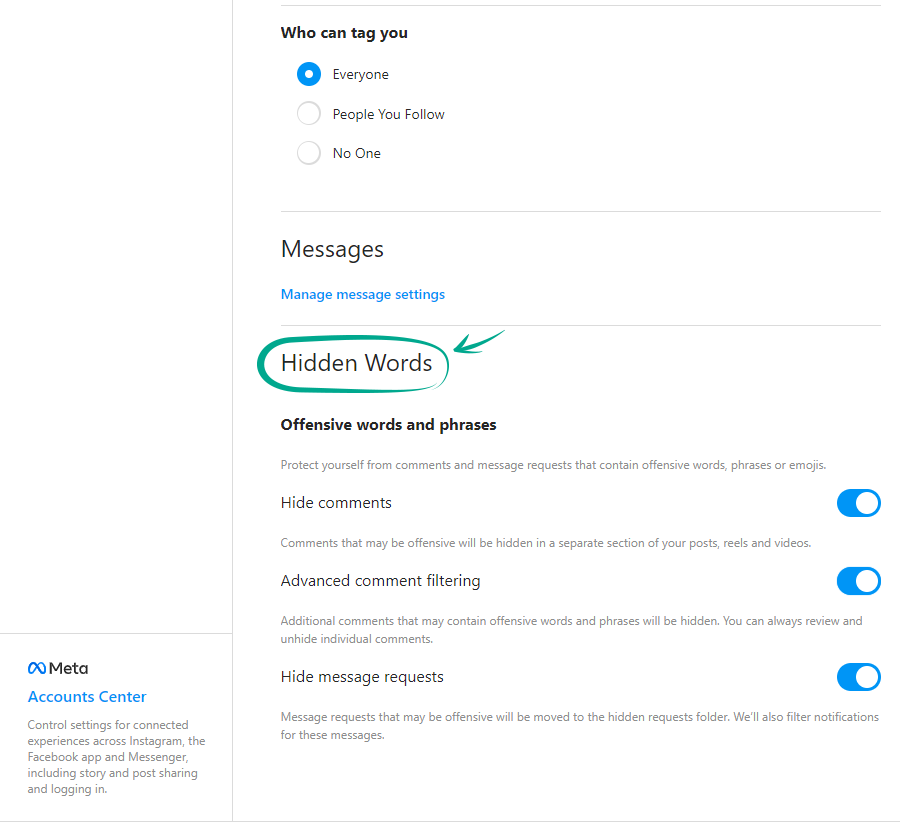
- Scroll down to the Hidden Words section;
- Turn on the following options:
- Hide comments — to enable the built-in Instagram filter (the feature is enabled by default);
- Advanced Comment Filtering — for even more thorough filtering of comments under your posts;
- Hide Message Requests — to hide message requests that may be insulting.
You can also set a custom list of words, comments with which will be hidden from you:
- Scroll up the page and click Edit Comment Settings in the Comments section;
- Add words, expressions, numbers and emojis, comments with which you want to hide in the Comment filtering field and click Submit to configure your custom filter;
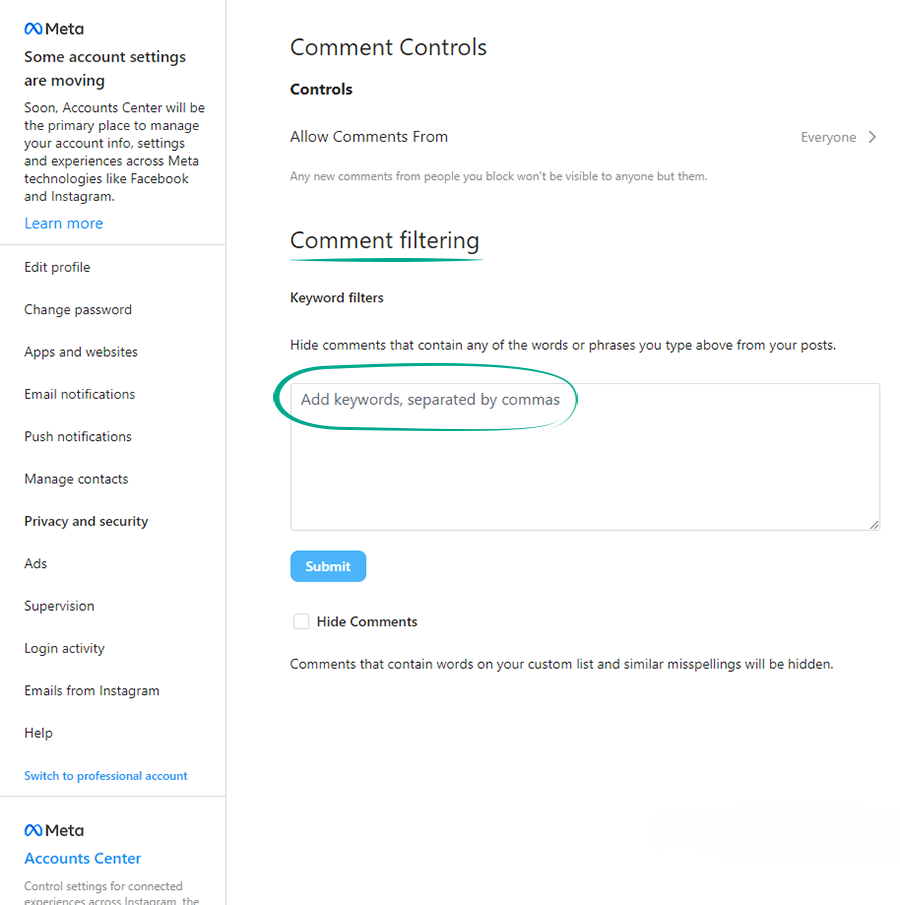
- Select Hide Comments to apply a custom list of hidden words.
What for: To avoid unpleasant people.
If you want to stop communicating with a specific user, you can block them. As soon as an unwanted person is blocked, you will automatically unsubscribe from each other (if you were subscribed), and all their likes and comments on your content will disappear.
To block a user:
- Go to this user's page;
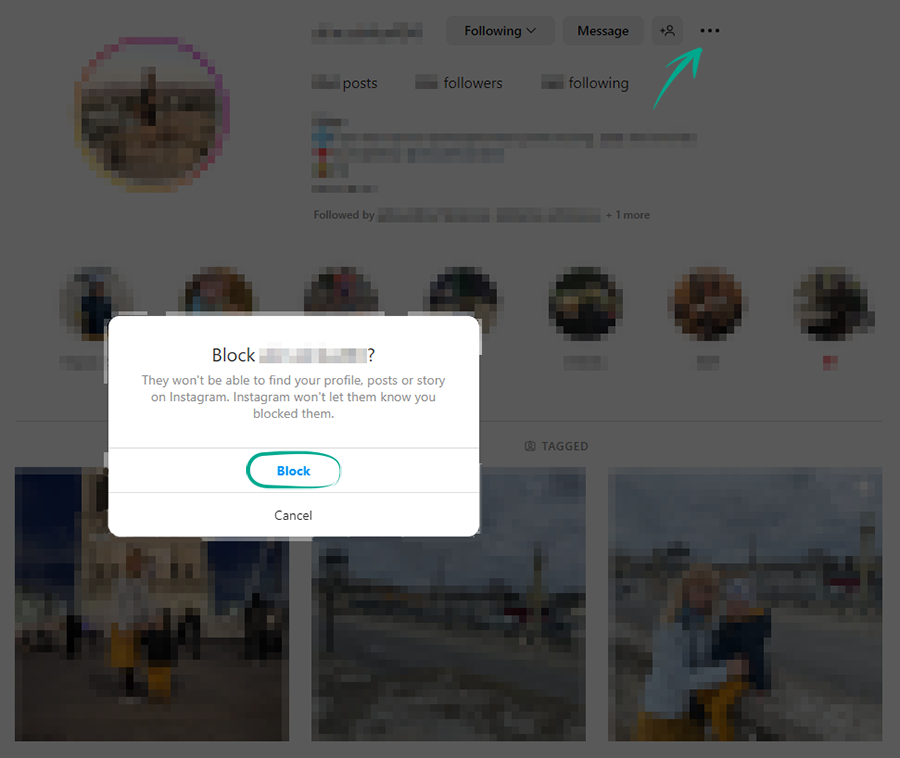
- Click the three dots in the upper right corner of the screen;
- Select Block and confirm your choice.
Blocked users will not be able to view your profile, comment your content, or send you private messages. In this case, the user will not know that you blocked them.
What for: To avoid spammers.
When someone sends you a private message for the first time, you first receive a message request from them, which is displayed in the corresponding tab of the personal messages screen. To start messaging with this person, you need to accept the message request first. However, you will still see the content of these requests, which you may not like.
To stop receiving message requests from strangers:
- Click More in the lower left corner of the screen;
- Select Settings;
- Go to the Privacy and security section;
- In the Messages section, click Manage Message Settings;
- In the Other on Instagram and Others on Facebook items, select the Don't Receive Requests option;
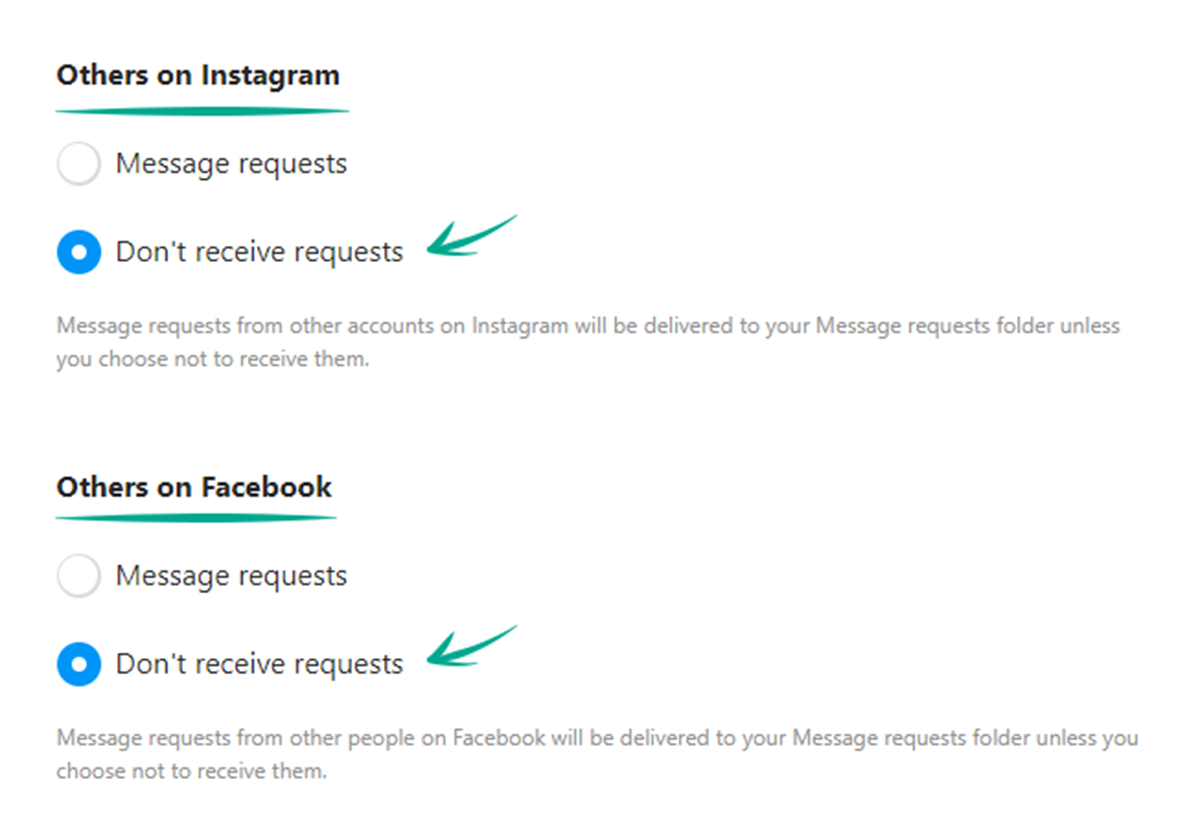
- If you have a Facebook account added, repeat this action for the following items:
- Friends of Friends on Facebook;
- People who have your phone number.
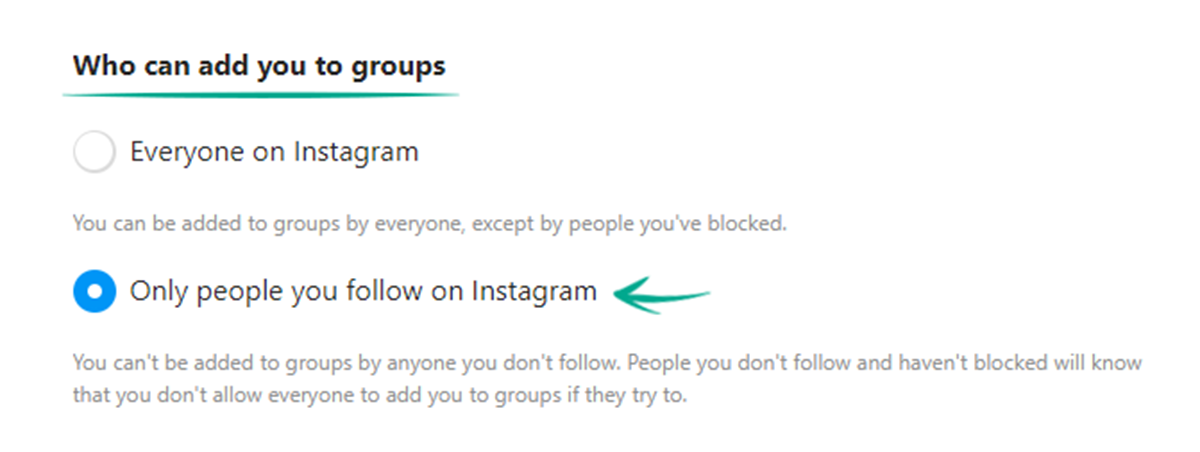
Social network users can also add you to group chats (groups). This feature can be used by spammers. To stop receiving unwanted messages:
- Scroll down to the Group Settings section;
- In the Who can add you to groups item, select the Only people you follow on Instagram option.
What for: So that your followers don't upset you.
Let's say one of your followers started bothering you in comments or private messages, but for some reason you don't want or can't block them permanently. In this case, you can restrict the ability of a particular user to interact with you and your account.
To protect yourself from prying or unpleasant followers:
- Navigate to the profile of the person with whom you would like to minimize interaction to a safe minimum;
- Click the three dots in the upper right corner of the screen and select Restrict;
- Confirm your choice.
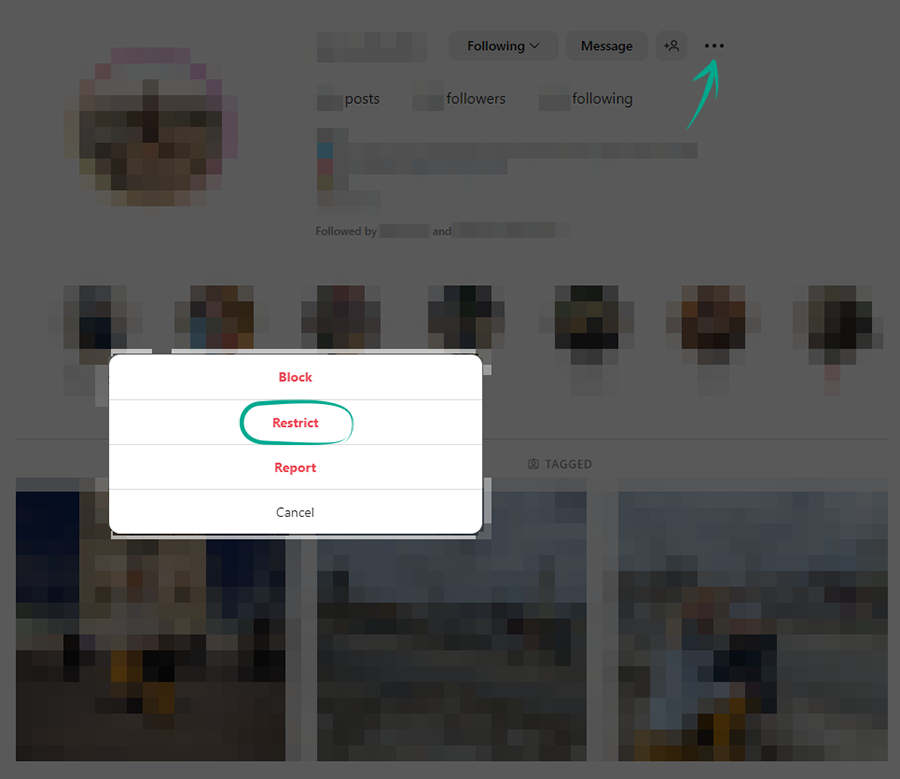
Now the comments of this person on your posts will be seen only by you and them, and for you they will be hidden until you decide that you want to read them. Your correspondence with this user will be hidden from the chat list, and the user will not know when you are online.
What for: So that you are not bothered by people you do not know.
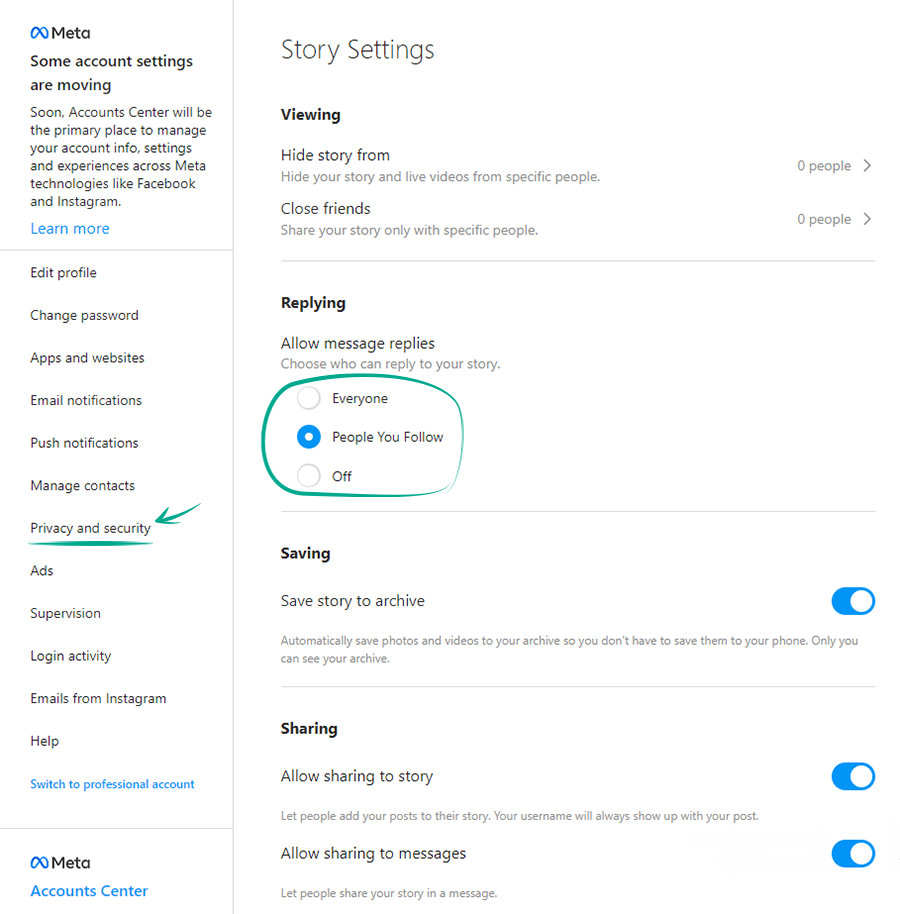
By default, everyone who sees your stories can respond and react to them. Responses and reactions are displayed in personal messages, which means that if your stories are public, ill-wishers and advertisers can use this feature and flood you with spam and unpleasant messages.
To prevent strangers from responding to your stories:
- Click More in the lower left corner of the screen;
- Select Settings;
- Go to the Privacy and security section;
- In the Story section, click Edit story settings;
- In the Privacy and security section, select one of the following items:
- People You Follow;
- Off.
What for: So that trolls and advertisers don't bother you.
Instagram users can tag you in photos and videos in their posts. Such posts automatically appear on your profile and become visible to all users. If you don't want everyone to be able to tag you in their posts, disable this feature.
To limit the circle of people who can tag you in posts:
- Click More in the lower left corner of the screen;
- Select Settings;
- Go to the Privacy and security section;
- Scroll down to the Publications section and select one of the options under Who Can Tag You:
- People You Follow;
- No One;
- Confirm your choice.
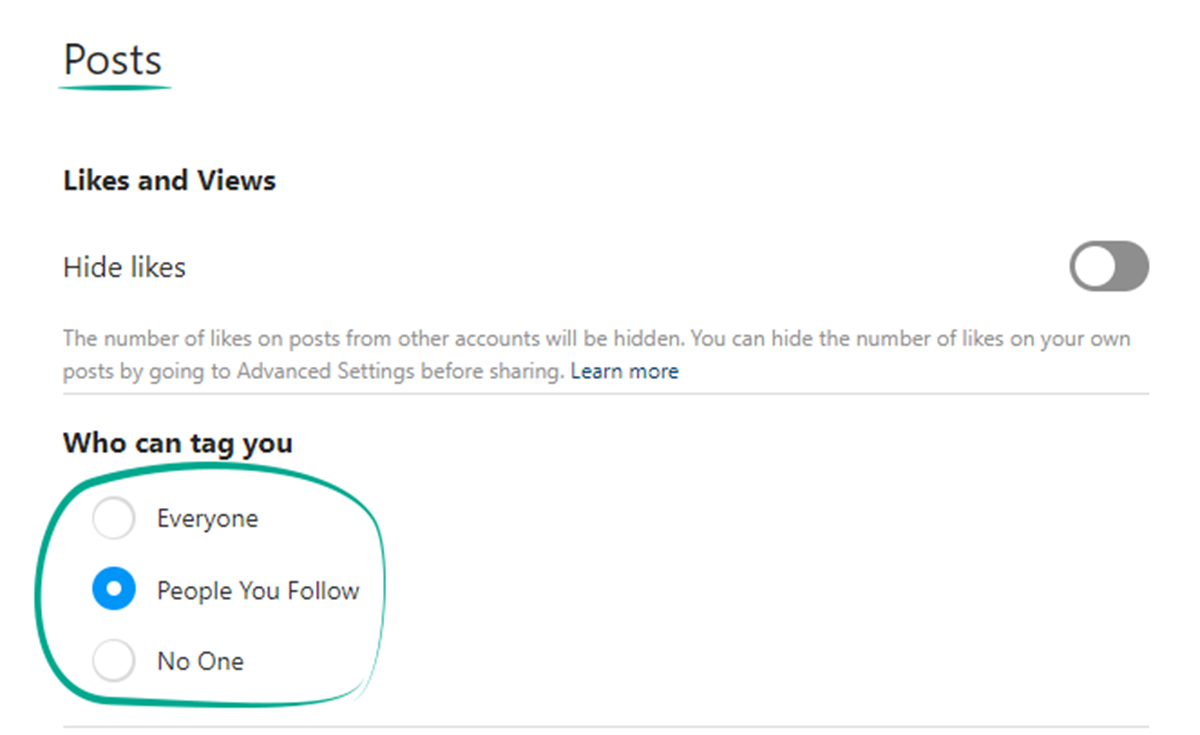
To manually select posts where you were tagged by other users, scroll up the page and check the Add Manually box in the Photos with You section.
Other users can also tag you in their stories, comments, live broadcasts, and content captions. This function can also be used by ill-wishers and spammers. To protect yourself from this:
- In the Privacy and Security section, select Mentions;
- Check one of the items:
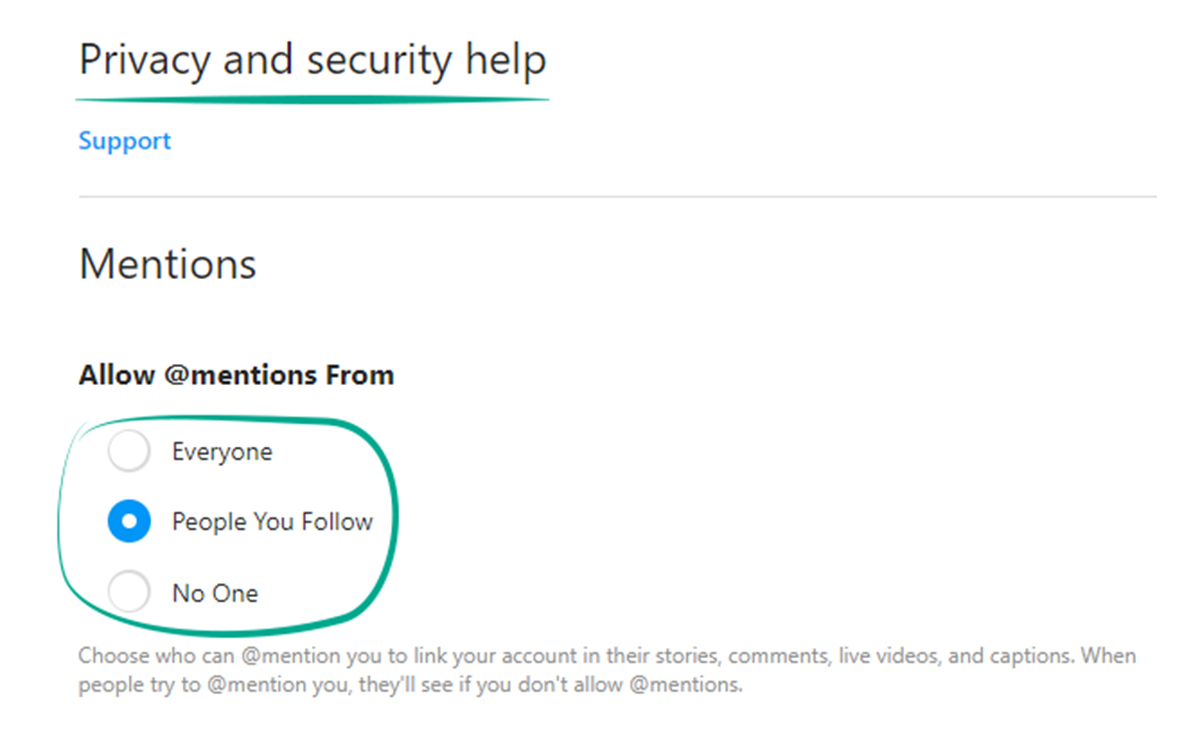
- People You Follow;
- No One.
How to hide posts from unwanted people
What for: So that only your close friends have access to your stories.
By default, your stories are visible to all followers. However, you can stop specific users from viewing them. This can be helpful if you use stories to post personal photos and videos that you do not wish to share with everybody.
To configure the visibility of stories:
- Click More in the lower left corner of the screen;
- Select Settings;
- Go to the Privacy and security section;
- In the Story section, click Edit story settings;
- Click Hide story from;
- In the window that opens, select the followers from whom you want to hide your stories.
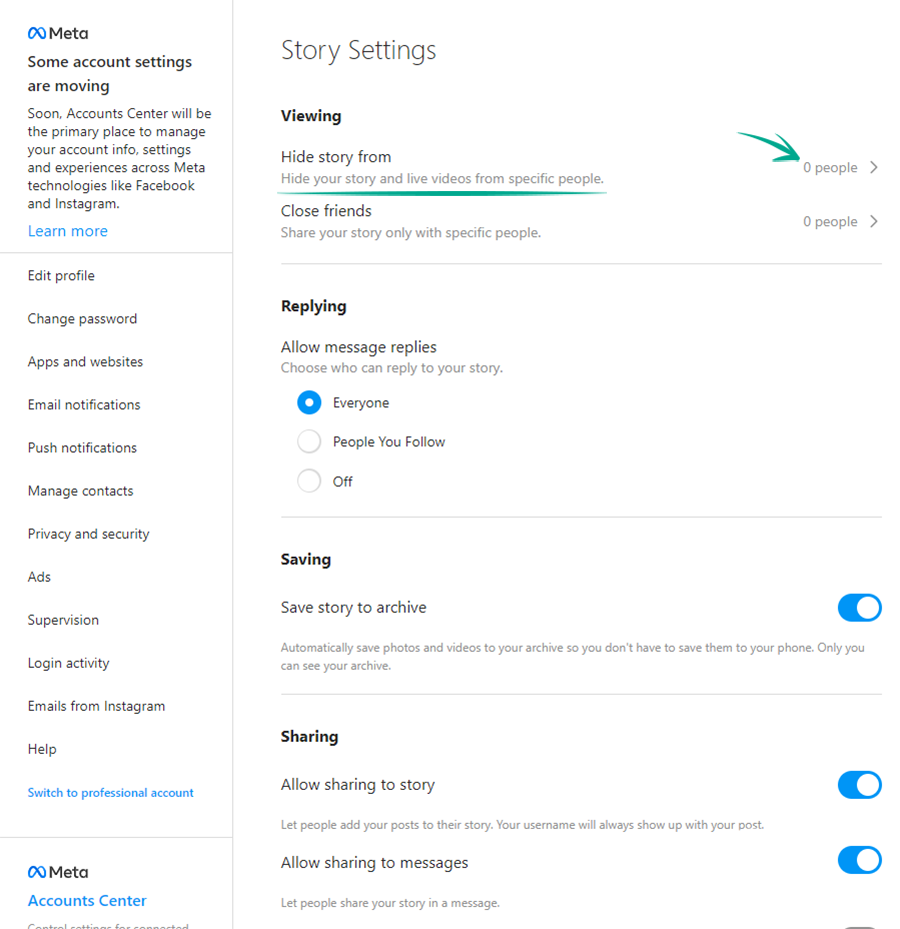
You can also show your stories only to a limited number of followers added to the list of close friends.
To create or edit this list:
- Go back to the Story Settings;
- Click Close Friends;
- In the window that opens, select the followers you want to add to the list of close friends.
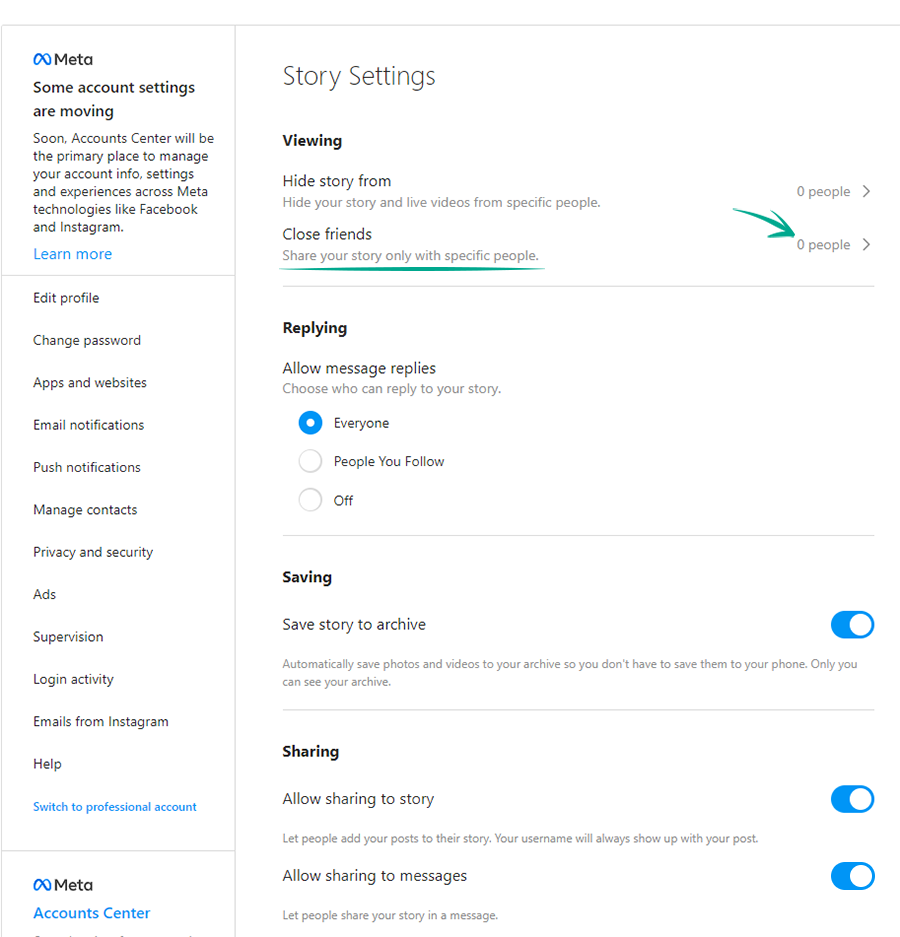
To make a story visible only to close friends, while publishing the story click the green icon with a star at the bottom of the screen.
What for: To keep your posts from being shared beyond the intended audience.
By default, Instagram users can add your posts to their stories, as well as share them and your stories in private messages with other users and add them to guides. You can stop others from using your posts:
- Click More in the lower left corner of the screen;
- Select Settings;
- Go to the Privacy and security section;
- In the Story section, click Edit story settings;
- Disable the following options in the Post section:
- Allow Resharing to Story — to stop other users from adding your posts to their stories. You will not see this item if you have a private account;
- Allow Sharing as Message — to stop other users from sharing your stories as messages;
- Go back to the Privacy and Security section;
- In the Guides section, disable the Allow others to use your posts option.

How to prevent your personal data from being exposed
What for: To prevent cybercriminals from getting hold of your personal information.
By default, your posts are visible to all Instagram users. Search engines can also include your posts in search results. If your profile is public, information in posts can be used against you. For example, information about your personal life can help telephone fraudsters to make up a convincing story in order to steal money from your bank accounts.
You can make your account private to make your posts visible only to approved followers:
- Click More in the lower left corner of the screen;
- Select Settings;
- Go to the Privacy and security section;
- Select the Private Account check mark in the Switch to Private section and confirm your choice.
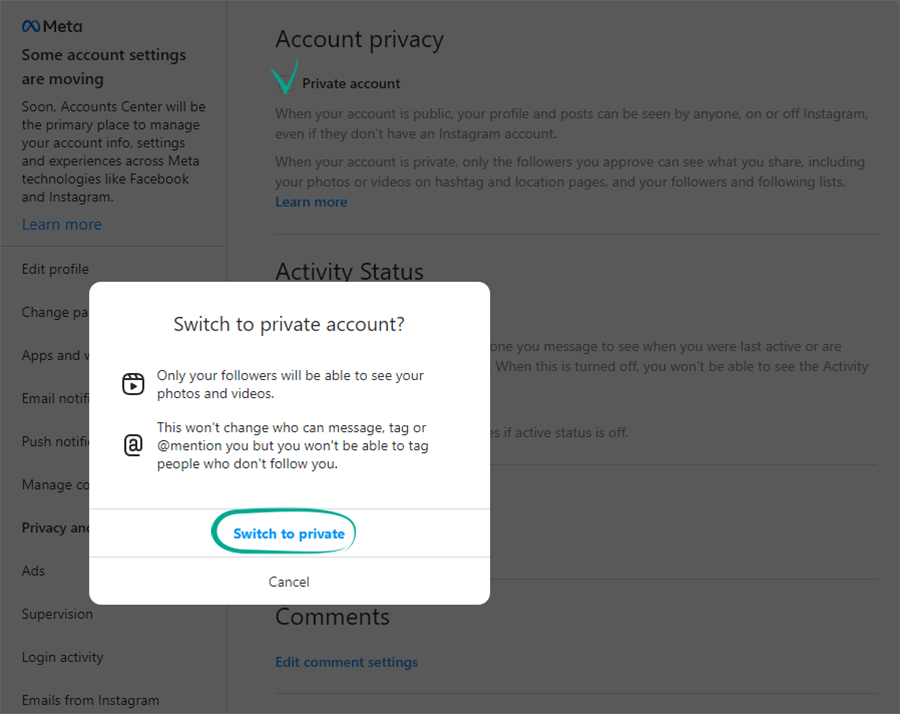
Existing followers will still be able to see your posts. You can remove those followers with whom you do not want to share your posts:
- Go to your profile and click the number of followers at the top of the screen;
- Find the person you want to delete and click Remove to the right of the Follow tab;
- Click Remove in the window that opens and confirm your selection.

The user will not be notified that you have removed him from the list of followers.
Keep in mind that when you share a post from a private Instagram account on a different social network, post visibility will depend on settings of this social network and not Instagram.
What for: So that deleted stories are actually deleted.
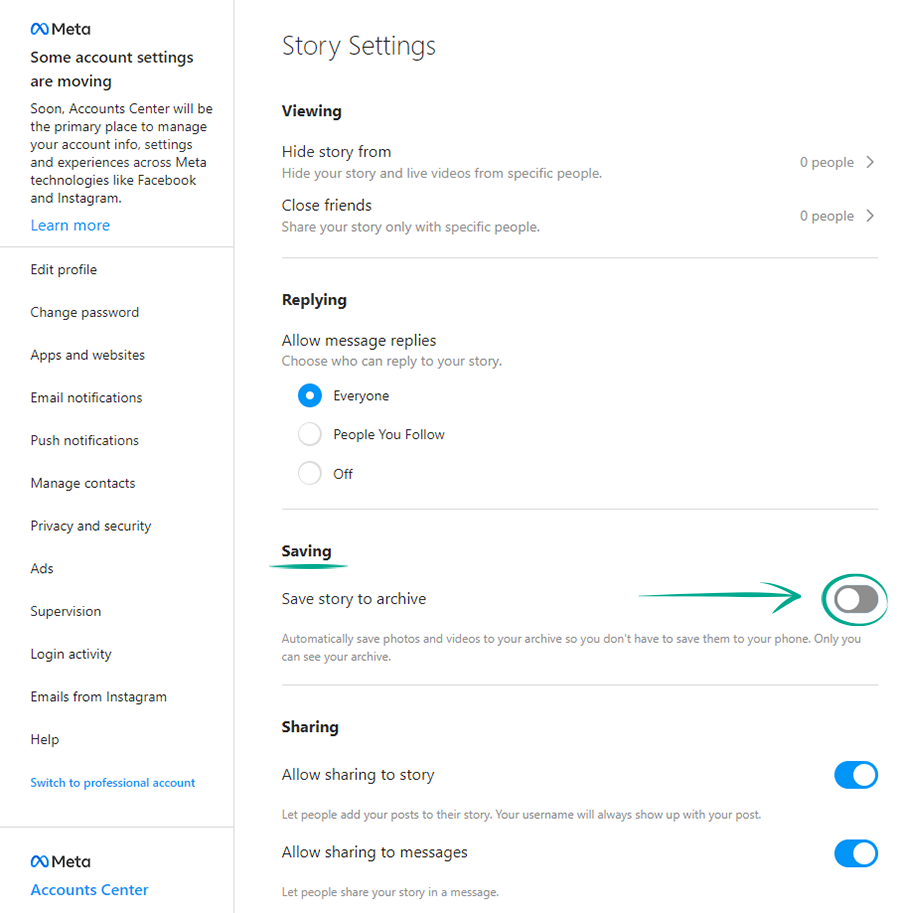
By default, your stories are available to followers for 24 hours, after which they are saved in the archive. If cybercriminals hack your account, they will be able to see posts that you believe to have been removed.
To disable data archiving:
- Click More in the lower left corner of the screen;
- Select Settings;
- Go to the Privacy and security section;
- In the Story section, click Edit story settings;
- Disable the Saving option.
What for: To stop showing everybody when you are online.
By default, Instagram shows when you are online or the last time you went online to your followers and users to whom you sent direct messages. Your ex-partners or other interested people could monitor your status and spam you with their messages when you are online.
Also, if you befriend people you don't know personally, this information could be used by an intruder to choose the best time to hack your account. By observing your status over a period of several days, they will see when you are likely to be offline and unable to respond promptly to an attack.
To stop showing your activity status:
- Click More in the lower left corner of the screen;
- Select Settings;
- Go to the Privacy and security section;
- In the Activity Status, uncheck Show Online status.
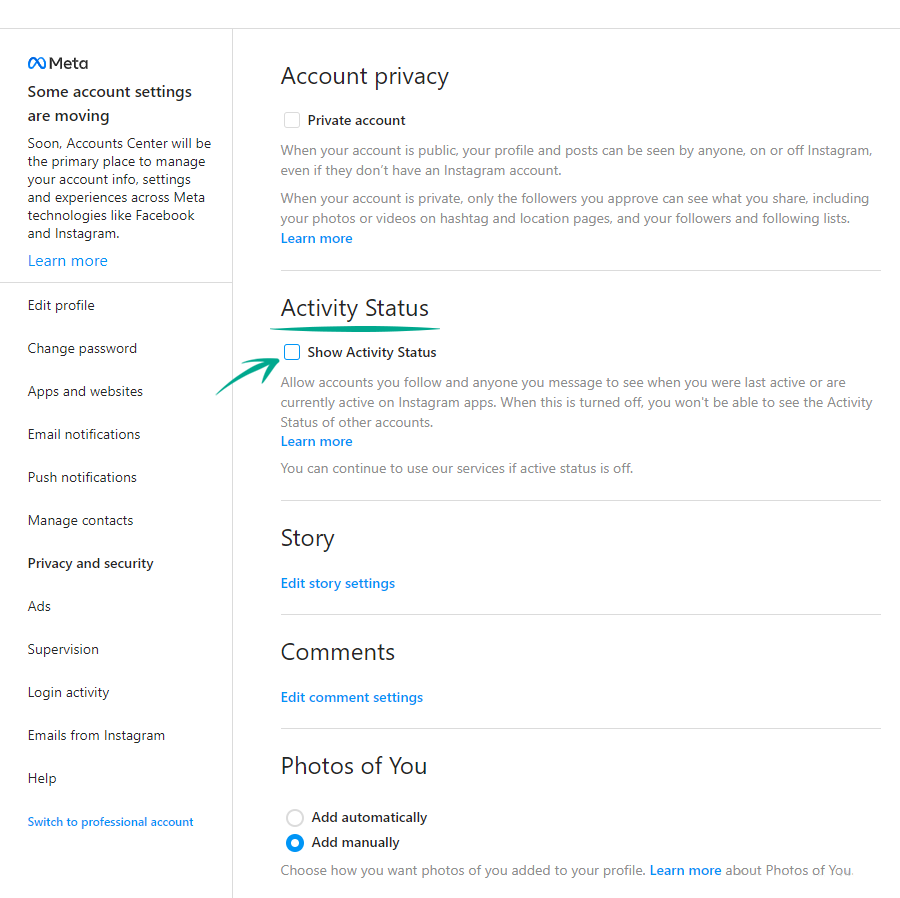
Downside: By hiding your status you will also be unable to see the activity status of your followers.
What for: To make it more difficult to identify you on the social network.
Instagram does not require you to specify your accurate information. You can make your account anonymous if you don't want people to associate it with you:
- upload any image that makes it impossible to determine that the account belongs specifically to you as your profile photo;
- use an alias;
- remove information about yourself and the link to your website if you specified them previously.
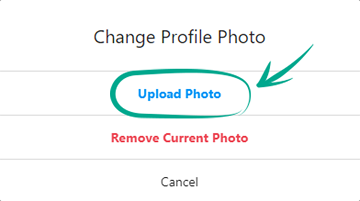
To change the profile photo:
- In the menu on the left, click Profile;
- Click Edit Profile and then Change Profile Photo;
- Click Delete Profile Photo, then Change Profile Photo again;
- Upload a new photo;
- Enter made-up information in the Name and Username fields;
- Remove personal information from the Bio section;
- Click Submit at the end of the page;
- To remove the link to the site, use the app for iOS and Android.
What for: To prevent unwanted people from finding your profile.
Instagram recommends your profile to users with similar interests by showing information about your account in search results and news feeds of other users. To exclude your profile from suggestions and search results, disable this feature:
- In the menu on the left, click Profile;
- Click Edit Profile;
- Uncheck the box next to Show recommended accounts in profiles;
- Click Submit.
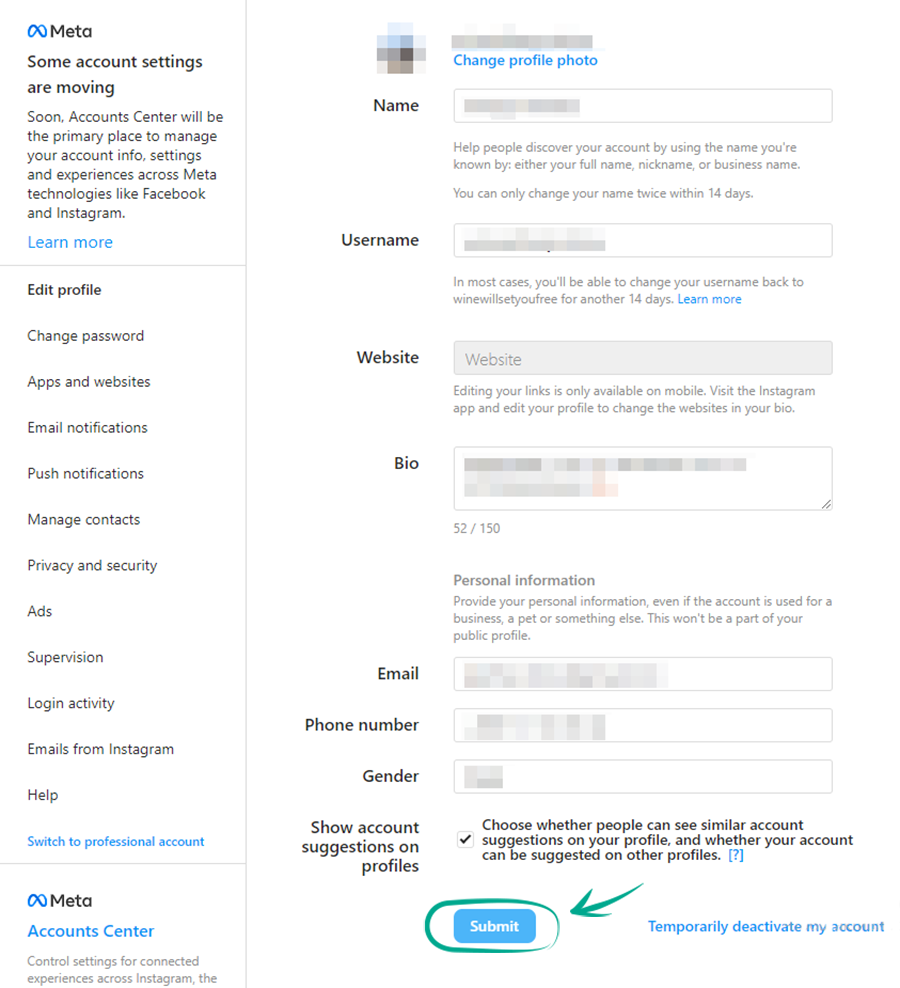
Downside: You will also stop seeing suggestions to follow accounts of other users.
How to hide unwanted content
What for: So as not to receive too many notifications.
Instagram sends users push notifications and e-mails with ads. If you are bothered by such notifications, you can stop the service from distracting you.
To stop Instagram from sending ads via push notifications:
- Click More in the lower left corner of the screen;
- Select Settings;
- Go to the Push notifications section;
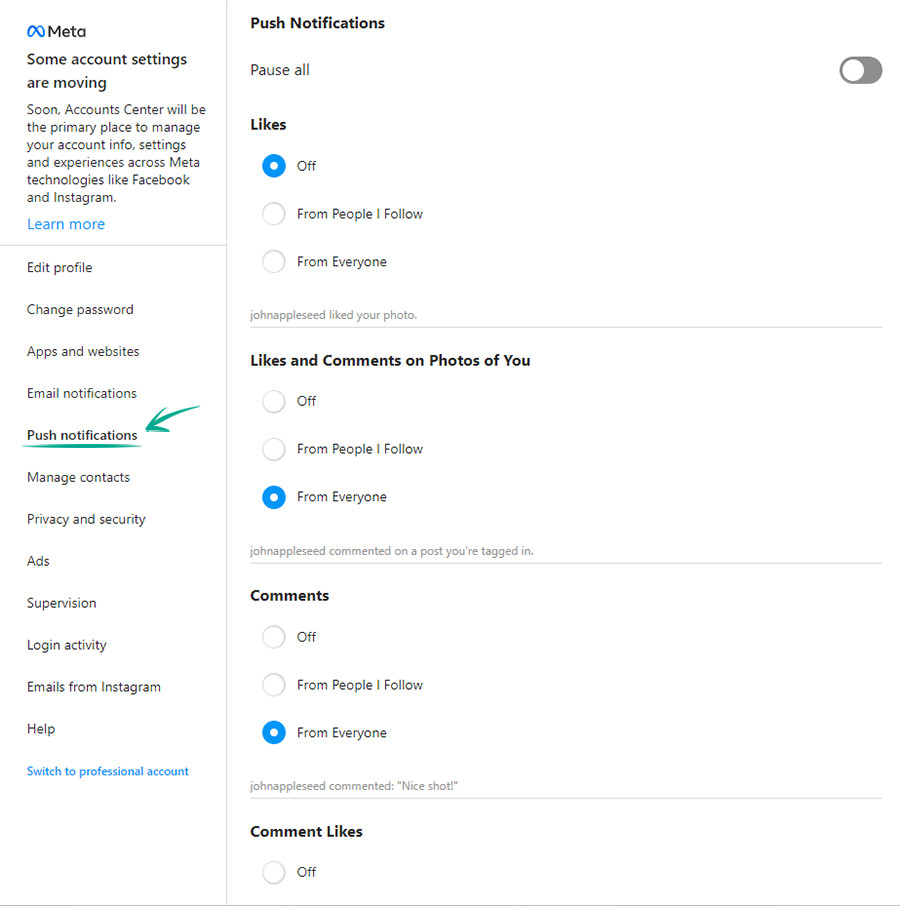
- Scroll down the page and under the item Product Notifications & feedback, select Off.
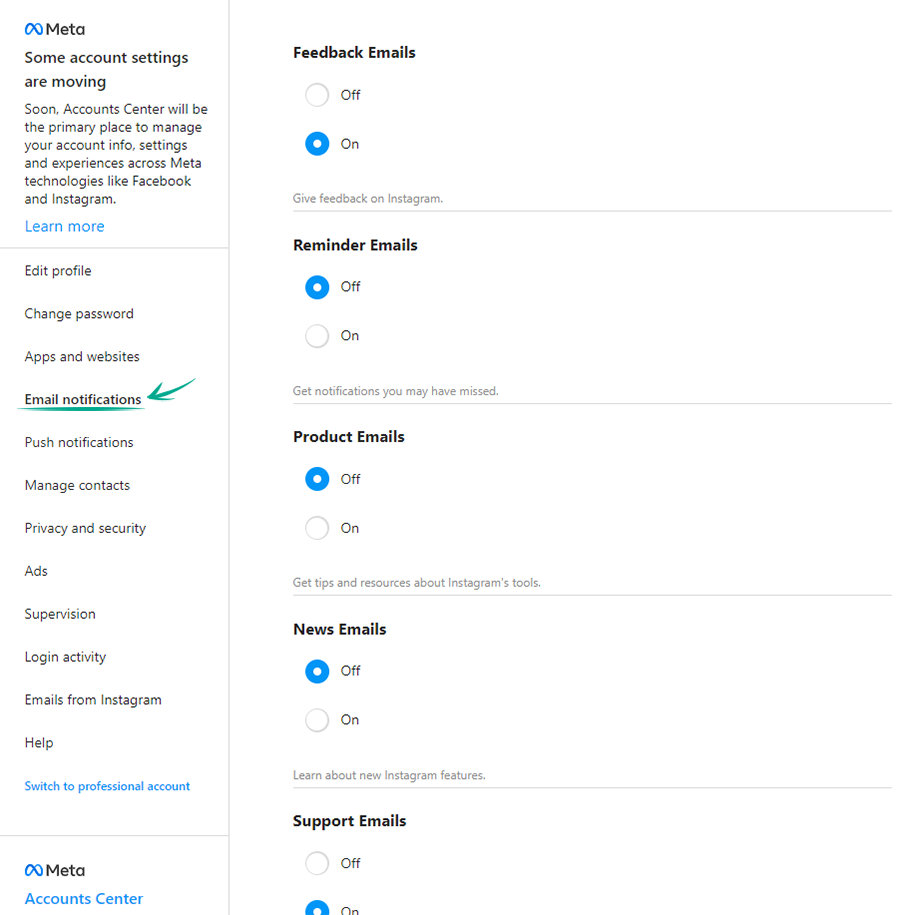
To disable e-mail notifications:
- Scroll up the page and go to the Email Notifications tab in the menu on the left;
- Select Off next to:
- Product e-mails;
- Emails with news.
How to clean up your traces
What for: To prevent people from finding you by your phone number.
Instagram users who have your number in the contact list will see suggestions to follow you. This feature can be abused by advertisers and cybercriminals. You can remove your phone number from the profile, preventing them from finding your account based on this number.
Important. If you have two-factor authentication by text message enabled, you will have to disable it and select another method of receiving the one-time code in the iOS or Android app.
You can then remove your phone number from the profile:
- Go to your profile and click Edit Profile;
- Enter your e-mail address in the Email field if it is still blank;
- Click your number in the Phone number field;
- Remove your number and click Submit.
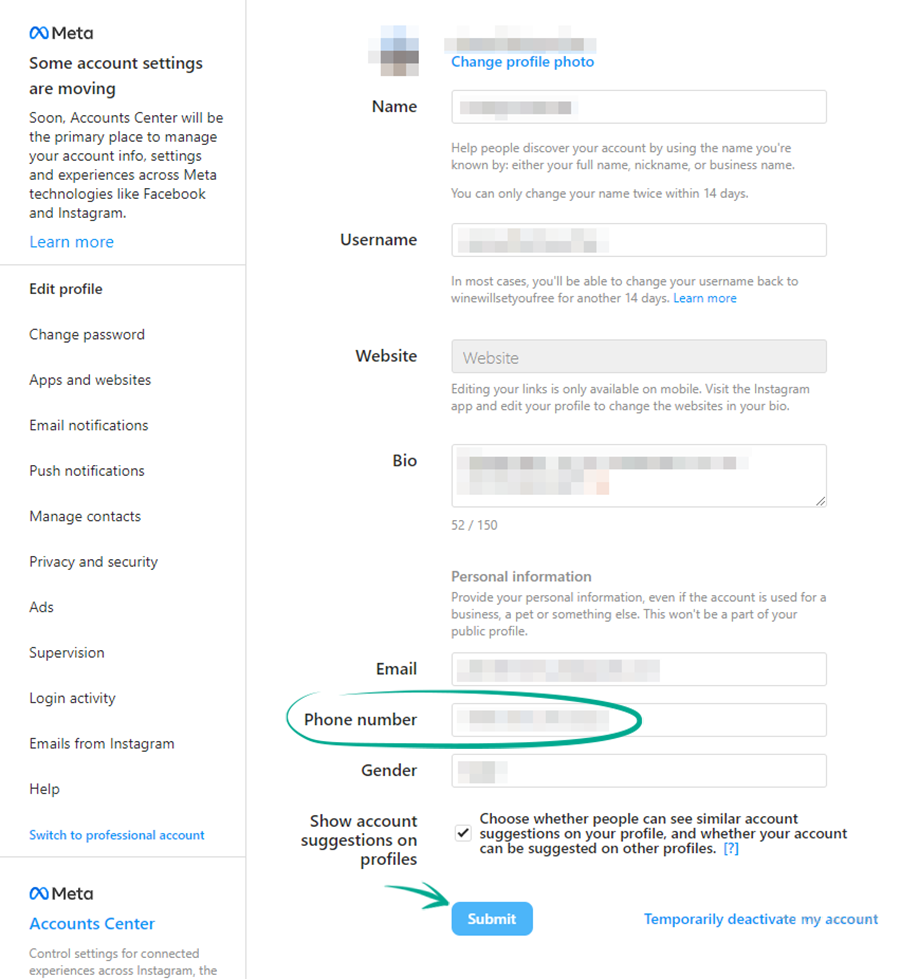
Keep in mind that after removing your phone number, you link your account to your e-mail address. This means that access recovery instructions will be sent to your e-mail address if you forget your password. Make sure that your e-mail account is secure and you have constant access to it.
What for: To see what information Instagram has on you and create a backup copy of important data.
You can download photos, comments, profile data and other information relating to your account. You can also find out what kind of information Instagram collects about you as well as save important information in case you lose your account.
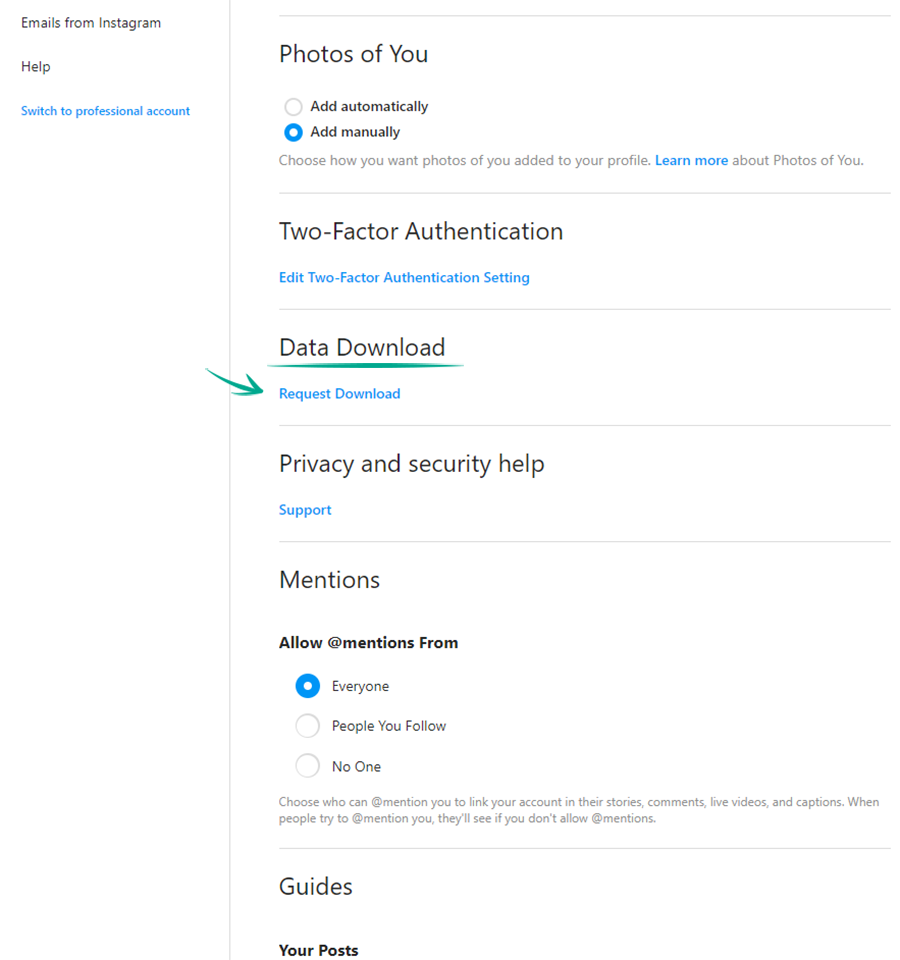
To download an archive with your data:
- Click More in the lower left corner of the screen;
- Select Settings;
- Select the Privacy and Security tab;
- Click Request Download in the Data Download section;
- Enter the e-mail address where you wish to receive data, choose a file format and click Next;
- Enter your Instagram account password and click Request Download;
- You will receive a link for the data archive download within two weeks.
You can delete information collected by Instagram only by removing the account itself.
Citizens of the European Union can request removal of their data pursuant to Article 17 of the General Data Protection Regulations (GDPR). Instagram is obligated to take steps to remove the information you indicated even if it has been transferred to third parties. The social network must present a progress report or reason for refusal within one month. The list of possible reasons for refusal is provided in Part 3 of Article 17 of the GDPR.


